• ABOUT
  • FACES
  • STAFF
  • ProgressivE-zine
  • Books - PPH
  • SHOP
  • Exhibitions
  • OOB Out Of Bounds
  • Fake world / Confused Reality
  • FEATURED photographers
    • PHOTOS OF THE WEEK
    • PROGRESSIVE COVERS
    • STORY TIME
    • CHALLENGES
    • MATCHING MOMENTS
    • VIDEO
    • GALLERIES PDFS
  • NOTES From the Streets
  • PROTESTS in the World
    • 2026
    • 2025
    • 2024
  • TIPS
  • Index SEARCH
  • Contact
  • SPOKESPERSONS
  • ProgresFestival MAGAZINE

Progressive Street

  • ABOUT
  • FACES
  • STAFF
  • ProgressivE-zine
  • Books - PPH
  • SHOP
  • Exhibitions
  • OOB Out Of Bounds
  • Fake world / Confused Reality
  • FEATURED photographers
    • PHOTOS OF THE WEEK
    • PROGRESSIVE COVERS
    • STORY TIME
    • CHALLENGES
    • MATCHING MOMENTS
    • VIDEO
    • GALLERIES PDFS
  • NOTES From the Streets
  • PROTESTS in the World
    • 2026
    • 2025
    • 2024
  • TIPS
  • Index SEARCH
  • Contact
  • SPOKESPERSONS
  • ProgresFestival MAGAZINE

William Eggleston by Batsceba Hardy

Which is Better? Black and White or Colour?

“One very important difference between color and monochromatic photography is this: in black and white you suggest; in color you state. Much can be implied by suggestion, but statement demands certainty... absolute certainty.” Paul Outerbridge

"I have done no color of consequence for thirty years! I have a problem with color—I cannot adjust to the limited controls of values and colors. With black-and-white I feel free and confident of results". Ansel Adams

__________________________________________________

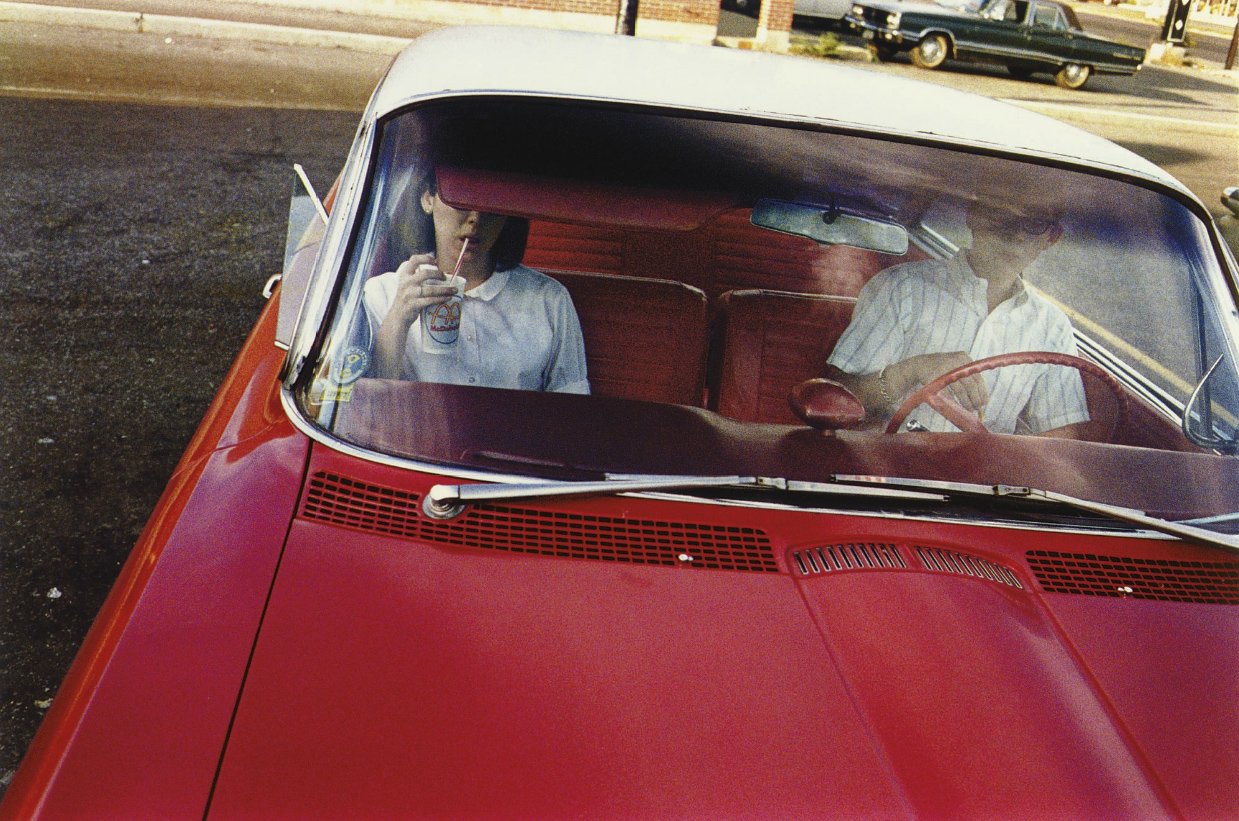
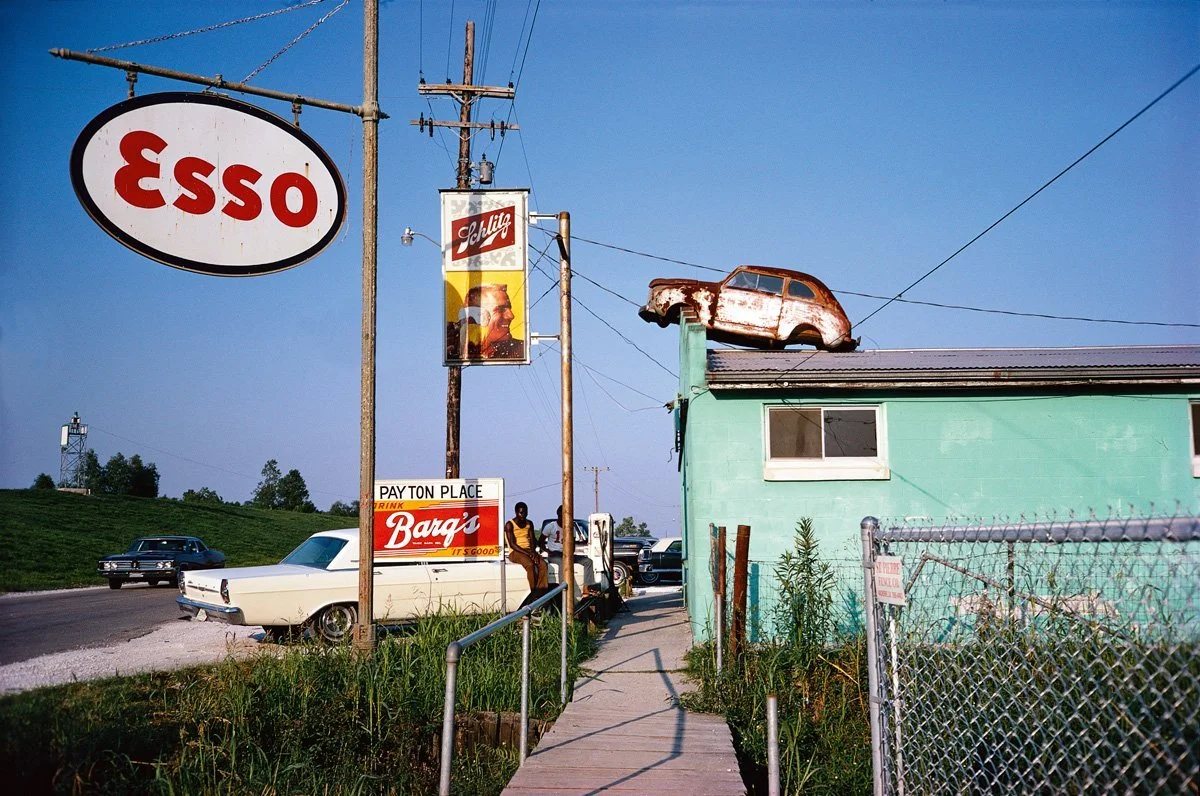
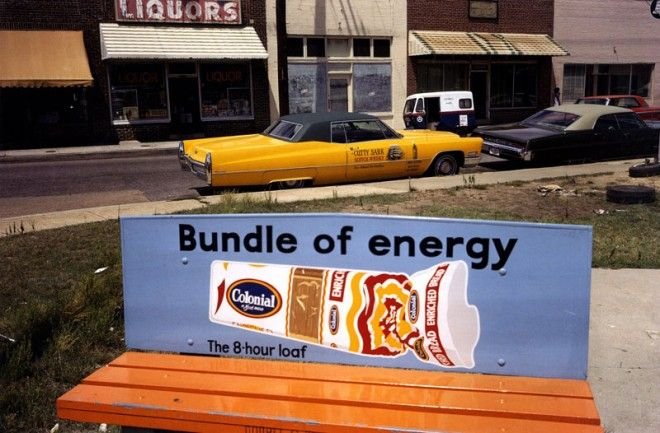
[4] William Eggleston

William Eggleston

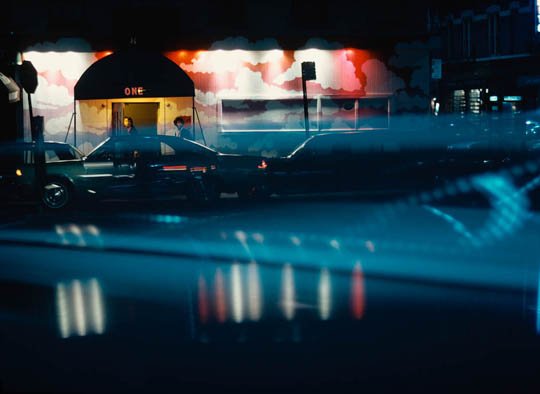
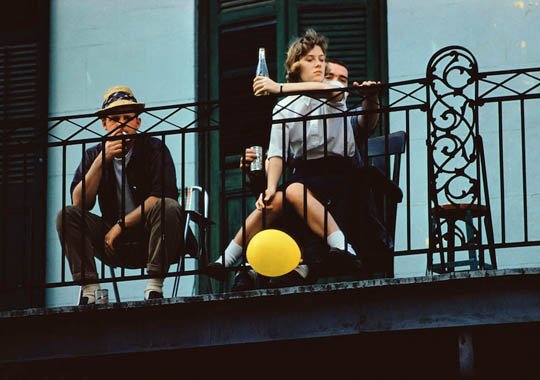
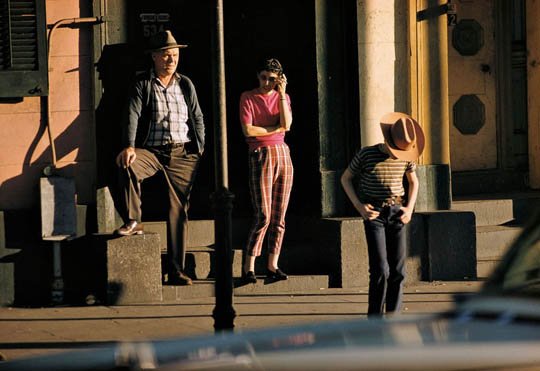
William Eggleston, born on July 27, 1939, in Memphis, Tennessee, is a renowned color photographer who has set an example of the significance of staying true to one's personal style and capturing what one loves. He is recognized for his aristocratic background and Southern charm, and is often depicted with a drink and cigarette in his hand.

At the age of 18, he got his first camera and started printing black and white photographs on his own. After using black and white film for a few years, Eggleston was introduced to color film by William Christenberry in 1965. He managed to create impactful photos that could evoke a sense of discomfort out of seemingly mundane subjects.

Eggleston, preferred to work with color slide film due to its saturated colors. He developed his style in complete isolation, and when he presented a suitcase containing his prints to John Szarkowski of New York's Museum of Modern Art in 1969, nobody had witnessed anything like it before.

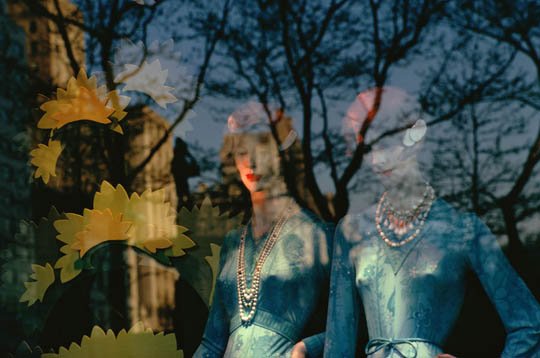
In the early 1970s, Eggleston taught at Harvard and discovered the dye-transfer printing technique. Previously, this technique had only been used for commercial prints such as cigarette packaging. However, the color saturation and ink quality were unparalleled, and when Eggleston applied this technique to his own images, it resulted in some of his most celebrated work. His photography is known for its flashy colors and recurring motifs of American cars, road signs, kitsch objects, and fast-food restaurant condiments. Eggleston primarily focuses on capturing the beauty of everyday objects, marginal objects, that are often overlooked by society.

In 1976, William Eggleston held his first major photography exhibition at the Museum of Modern Art in New York. When he exhibited his hyper-saturated photographs, his style caused a stir in the photographic establishment of the time, which was still primarily focused on black and white documentary photography. Ansel Adams even wrote a letter of complaint to the MoMA, and the critics harshly criticized Eggleston. What was particularly disconcerting for them, besides his use of color, was Eggleston's attention to the banal, which followers of the 'decisive moment' deemed boring and insignificant. In photographs such as Red Ceiling, which is Eggleston's most famous photograph, there is neither action nor an identifiable subject, other than color. Eggleston's photographs may appear to be mundane, simple color recordings of his surroundings, but the light, composition, and colors are all carefully designed and executed. Eggleston believed that the critics simply didn't understand his work, which was meant to be unspectacular and a modern form of art. Despite the initial negative reviews, Eggleston's career began to gain worldwide recognition, and eventually, the critics apologized for their misguided opinions. And his "democratic gaze," has become deeply ingrained in our visual culture. Eggleston's impact has been felt by many notable photographers such as Stephen Shore, Martin Parr, and Nan Goldin, as well as filmmakers like Wim Wenders and Gus Van Sant.

His work is often described as esoteric, and he has been interviewed by many journalists who hoped to gain insight into his photographic process. However, Eggleston's explanations of his work are often deemed useless, as he prefers not to explain the meaning behind his shots.

View fullsize ff6b93_b2069f7b7b8744c3be6610c7bfe0003e.jpg
View fullsize ff6b93_c9151930ff1e4a5180959d255aaf2b03.jpg
View fullsize ff6b93_2c931244a3424519b3cf26b60788e9f0.jpg
View fullsize d92zws0-6035ffaf-c1b8-43bd-be6a-6c26eaab268d.jpg
View fullsize ff6b93_a2ebe267f4104f5da1277be4ab5c862f.jpg
View fullsize d92zw08-83991d30-4a8e-4cb1-9146-213fc12edf8e.jpg
View fullsize d92zvy5-14b61ca0-1e89-4380-ab5b-b924b082d214.jpg
View fullsize d92zu4i-1cee1b52-6db9-4b4e-85be-c0d66beb1bb2.jpg
View fullsize d92zwmc-67957f98-edcc-408c-aecd-dd7429aa9f60.jpg
View fullsize 03_William-Eggleston-Untitled-c.-1970–1973_c_Eggleston-Artistic-Trust-and-David-Zwirner.jpg
View fullsize ff6b93_888ea1c9c2ec450f956bad59eb27b9f4.jpg
View fullsize ff6b93_bdc4f53290464679b2b7f1ecae490ea3.jpg
View fullsize Screenshot 2023-10-13 alle 12.54.23.png
View fullsize d92zthr-e8ea210d-3aa0-4fee-a3bb-9b3411ebe519.jpg
View fullsize Screenshot 2023-10-13 alle 12.50.09.png
View fullsize d92zu5r-dc642a74-4d44-43d3-b63b-d4ea255c5545.jpg
View fullsize d92zvz5-b56a05e2-513c-45bb-899f-4c37d427bdd3.jpg
View fullsize d92ztwx-fc4d5f95-71d1-4d8d-a2e9-fa80037f0db0.jpg
View fullsize ff6b93_a61f18a632ca4dedb49673b84810fd64.jpg
View fullsize d92zwlt-32549d9b-022f-4da8-bd18-40bdbc0f40b7.jpg

Eggleston's focus has primarily been on using Canon and Leica rangefinders, with Kodachrome film being his preferred choice for its highly saturated colors. However, he has also used several other cameras throughout his career, including a Leica M6, M3, and R5, a Canon VT, a Contax G2, a Pentax reflex, an Olympus Stylus Epic, a Mamiya 6x9, a Fuji GW690 6x9, and a Hasselblad.


The latest retrospective at the National Portrait Gallery in London brings together all the portraits he has taken from the beginning of his career to today.


QUOTES:

“Often people ask what I’m photographing. It’s a hard question to answer. And the best I’ve come up with is, I just say, ‘Life today.'”

“I only ever take one picture of one thing. Literally. Never two. So then that picture is taken and then the next one is waiting somewhere else.”

"I want to make a picture that could stand on its own, regardless of what it was a picture of. I’ve never been a bit interested in the fact that this was a picture of a blues musician or a street corner or something. ”

“I never know beforehand. Until I see it. It just happens all at once. I take a picture very quickly and instantly forget about it.”

” I just wait until [my subject] appears, which is often where I happen to be. Might be something right across the street. Might be something on down the road. And I’m usually very pleased when I get the image back. It’s usually exactly what I saw. I don’t have any favorites. Every picture is equal but different.”

“I’ve always assumed that the abstract qualities of [my] photographs are obvious. For instance, I can turn them upside down and they’re still interesting to me as pictures. If you turn a picture that’s not well organized upside down, it won’t work.”

“Whether a photo or music, or a drawing or anything else I might do— it’s ultimately all an abstraction of my peculiar experience.”

“A picture is what it is and I’ve never noticed that it helps to talk about them, or answer specific questions about them, much less volunteer information in words. It wouldn’t make any sense to explain them. Kind of diminishes them. People always want to know when something was taken, where it was taken, and, God knows, why it was taken. It gets really ridiculous. I mean, they’re right there, whatever they are.”

” Whatever it is about pictures, photographs, it’s just about impossible to follow up with words. They don’t have anything to do with each other.”

“You become technically proficient whether you want to or not, the more you take pictures.”

“Photography just gets us out of the house.”

“I am at war with the obvious.”

“I had this notion of what I called a democratic way of looking around, that nothing was more or less important.”

“There is no particular reason to search for meaning.”

“You can take a good picture of anything. A bad one, too.”

“It quickly came to be that I grew interested in photographing whatever was there wherever I happened to be. For any reason.”

“I don’t have a burning desire to go out and document anything. It just happens when it happens. It’s not a conscious effort, nor is it a struggle. Wouldn’t do it if it was. The idea of the suffering artist has never appealed to me. Being here is suffering enough.”

” I don’t really look at other people’s photographs at all. It takes enough time to look at my own.”

” I don’t have favorites. I look at pictures democratically. To me they are all equal. ”

“I am afraid that there are more people than I can imagine who can go no further than appreciating a picture that is a rectangle with an object in the middle of it, which they can identify. ”


Replacing the familiar strident colours with ominous washed-out tones, William Eggleston's latest works reveal an artist still evolving at the age of 70

"He has been “at war with the obvious,” working in a “democratic forest” where everything visible is equally viable as subject matter. Trees, dirt, signs, houses, carpets, red ceilings, naked men, old men with guns, tricycles, etc.  Working in this manner, he inspired many photographers to look no further than their immediate surroundings for inspiration. Then came digital cameras, and then the Internet, and then Flickr. Eggleston may have won the war with the obvious, but now the obvious is getting its revenge in the form of the millions of banal, boring, dull photographs that are bg uploaded to the web everyday. We don’t need to go far to find the ‘democratic forest,’ in fact, we may never be able to escape it." -- Bryan Formhals


[3] - Ernst Haas
Friday 10.13.23
Posted by Progressive-Street
 

Ernst Haas by Batsceba Hardy

Which is Better? Black and White or Colour?

“One very important difference between color and monochromatic photography is this: in black and white you suggest; in color you state. Much can be implied by suggestion, but statement demands certainty... absolute certainty.” Paul Outerbridge

"I have done no color of consequence for thirty years! I have a problem with color—I cannot adjust to the limited controls of values and colors. With black-and-white I feel free and confident of results". Ansel Adams

__________________________________________________

[3] - Ernst Haas

Ernst Haas, Austrian photographer, early portrait

©2023 ERNST HAAS ESTATE

Ernst Haas, born on March 2, 1921, in Vienna and passed away on September 12, 1986, was a renowned photojournalist and a trailblazer in the field of colour photography. He revolutionized colour photography using a 35mm camera (Leica) and primarily Kodachrome film. His images showcased an intense array of colours and light. He used various techniques to create evocative and metaphorical works. He employed shallow depth of field, selective focus, and blurred motion to transform objects from what they were to what he wanted them to be. He aimed to capture the joy of looking and human experience in his photography.

Throughout his four-decade-long career, Haas successfully bridged the gap between photojournalism and photography as a form of artistic expression. He was a pioneer in the use of colour photography and his work was widely published in magazines such as Life and Vogue. In 1962, his photographs were featured in the first-ever solo exhibition of colour photography at the Museum of Modern Art in New York. He also served as the president of Magnum Photos, a cooperative representing some of the world's most influential photographers. Haas' book, The Creation, published in 1971, was a huge success, selling over 350,000 copies.

"I never really wanted to be a photographer. It slowly grew out of the compromise of a boy who desired to combine two goals— explorer or painter. I wanted to travel, see and experience. What better profession could there be than the one of a photographer, almost a painter in a hurry, overwhelmed by too many constantly changing impressions? But all my inspirational influences came much more from all the arts than from photo magazines."

Haas faced difficulties in pursuing his formal education due to the war, but he was self-taught and put in a lot of effort to learn about photography. During his time as the "school photographer" of the Max Reinhardt Film Seminar in 1941, he was able to attend technical classes and developed an interest in filmmaking that lasted throughout his life. Haas used his family's vast library, as well as museums and libraries in Vienna, to expand his knowledge. He focused on studying philosophy and poetry, which helped him shape his beliefs about the creative potential of photography.

Billboard Painter, NY 1952

Locksmith Sign, NY 1952

Reflection—42nd Street, NY 1952

View from Notre Dame, Paris 1955

A cracked pane of glass, 1963


"I see what I think

I see what I feel because I am what I see

If there is nothing to see and I still see it,

That's poetry

If there is something to see and everybody sees it

That's photography."

Haas was a free artist, poet, and philosopher not hindered by tradition or theory. In 1949, during the early stages of colour photography, Hass began experimenting with it. He had already become proficient in the formal structures and style of photojournalism and street photography, but he increasingly became interested in using colour film as a tool for the metaphorical language of the image. Having lived through the horrors of World War II in Europe, Haas saw colour as a source of pure emotional joy and physical richness, a welcome respite from the bleak grey landscape of war.

Haas believed that colour represents joy. He once said that joy is not something one thinks about, but rather something that carries a person. Haas saw his change from one material to another as a symbolic and psychological progression in response to the outside world. He considered the war years and the five bitter post-war years as the black and white or grey years. However, those times were over, and he wanted to celebrate the new times, filled with new hope, by using colour, similar to the beginning of a new spring.

In 1951, as part of his Magnum assignment, Haas moved to New York City and started capturing the city's essence through his lens, resulting in a series of photographs titled "Images of a Magic City". After two years, Life magazine featured his work as their first-ever colour essay, spanning over 24 pages across two issues - a groundbreaking achievement. Unlike other photographers of his time, he did not merely use colour to document reality. Instead, he aimed to capture the surreal quality of dreams. He imbued ordinary objects and figures with new and deeper meanings. For instance, a reflection of a storefront could reveal hidden depths of the urban landscape. Similarly, torn posters peeling off a wall could transform into an art gallery. Haas experimented with colours and tones that had never been seen before in printed colour to evoke emotions in the viewer. His work was infused with a guiding intelligence that was both enlightening and humorous.

Haas, like his fellow photographers, took to the streets with his camera. However, unlike Weegee, Klein, Model, or Arbus, he did not adopt a confrontational approach. Nor did he document society with a critical eye, as Robert Frank did. Instead, Haas pursued a more poetic style, akin to Saul Leiter, Louis Faurer, David Vestal, and Sid Grossman. He sought a photographic equivalent of gestural drawing, using techniques such as soft focus, selective depth of field, and overexposure to create a lasting impact. Haas is also known for pioneering the concept of deliberate blur. He used time exposure against a continuous color background to create a controlled blur effect.

"I am a composer / I compose pictures,"

"I photograph fiction / as you can't find what I found."

"Photography became a language with which I have learned to write both prose and poetry."

Szarkowski had written about Haas, saying that in colour photography, the colours often served as a mere decoration that stood between the viewer and the actual content of the picture. However, Ernst Haas resolved this problem by making the colour sensation the subject of his work. According to Szarkowski, no photographer has been as successful as Haas in expressing the pure physical joy of seeing.


REFLECTIONS BY HAAS

*There are two kinds of photographers: those who compose pictures and those who take them. The former work in studios. For the latter, the studio is the world.... For them, the ordinary doesn't exist: every thing in life is a source of nourishment.

*The best pictures differentiate themselves by nuances...a tiny relationship - either a harmony or a disharmony - that creates a picture.

*A picture is the expression of an impression. If the beautiful were not in us, how would we ever recognize it?

*With photography a new language has been created. Now for the first time it is possible to express reality by reality. We can look at an impression as long as we wish, we can delve into it and, so to speak, renew past experiences at will.

*I want to be remembered much more for a total vision than for a few perfect single picture.

*I am not interested in shooting new things - I am interested to see things new.

*There is only you and your camera. The limitations in your photography are in yourself, for what we see is what we are.

*The most important lens you have is your legs.

*You become things, you become an atmosphere, and if you become it, which means you incorporate it within you, you can also give it back. You can put this feeling into a picture. A painter can do it. And a musician can do it and I think a photographer can do that too and that I would call the dreaming with open eyes. -

*The limitations of photography are in yourself, for what we see is only what we are.

*The camera doesn't make a bit of difference. All of them can record what you are seeing. But, you have to SEE.

*Best wide-angle lens? Two steps backward. Look for the 'ah-ha'.

*You don’t take pictures; the good ones happen to you.

*Living in a time of crusical struggle, the mechanization of men, photography for me became nothing but another example of this paradoxical problem: how to owercome, how to humanize the machine on which we are so very dependent – the camera. This mechanical instrument forces and enables us for for the first time to learn hwo to read and write stimultaneously visual aspects resulting from a discussion with reality expressed with a language of light called photography. Disinterested in scientific objectivity, I want to transform reality with a poetic conception by relating the unrelated into vision – forcing the viewer to feel what I felt as well as to think what I thought. I believe photography can be an art and I want to give everything to help achieve it. There is only you and your camera – the limitations of your photography are in yourself, for what we see is only what we are.

- Ernst Haas, The Best of Popular Photography by Harvey (V. Fondiller , ISBN: 0871650371 , Page: 97-98)

 
d92gddd-39a08e4b-bbec-43d1-9db8-490deaffface.jpg
d92gdb4-2763425f-e897-4016-8634-4c2a857ca78a.jpg
d92gdaz-a269d6a6-8090-4a53-8506-ec4567d1c1c9.jpg
Haas6_NYC_1980.jpg
d92gdcj-ff0ae30f-42dc-43e7-a5af-deee1eee104e.jpg
d92gdcn-73f79605-1455-453d-9a6c-0672ec310898.jpg
d92gdbt-3f26e2b8-37d4-4cd3-95ac-6ff542345456.jpg
d92gdak-f4795539-7629-46e3-bcd5-f97c94148c47.jpg
d92gdbb-b9345686-2655-4ca3-b179-1ed8ebd829e7.jpg
d92gdbm-b5e1cee6-87fa-4b60-805b-decd56d6333e.jpg

For me Ernst was sensitivity itself. He had an irresistible charm and wit, a knowledge of the world, its color, its stratis ficatious since its origin, various cultures he expressed so vividly in his photographs.He disappeared swiftly like a comet leaving behind a long trail of human understanding and with such finesse.I can hear him bursting out laughing and making fun of me if he read this.

– Henri Cartier-Bresson


In my estimation we have experienced an epoch in photography. Here is a free spirit, untrammeled by tradition and theory, who has gone out and found beauty unparalleled in photography. Some say it is an imitation of painting. Tommyrot! Show me a painter who can bring forth the power of this boy. Let us all stand and pay him tribute.

– Edward Steichen – The Museum of Modern Art, New York


The color in color photography has often seemed an irrelevant decorative screen between the viewer and the fact of the picture. Ernst Haas has resolved this conflict by making the color sensation itelf the subject matter of his world. No photographer has worked more successfully to express the sheer physical joy of seeing.

–John Szarkowski – The Museum of Modern Art, New York


He made us see his color. when some photographers take pictures, it doesn't matter whether they are working in black- and-white or color. But when Ernst shoots color, it makes all the difference in the world.

–Cornell Capa – International Center for Photography, New York


From letter dated October 5, 1961:

Dear Ernst Haas:
I wish I could tell you how much I appreciated your color photographs which you projected at the Asilomar Conference. I have seen thousands of color pictures, most I dislike for various reasons—sheer dullness to sheer decadence! The particular quality of your work was refreshment. I hope you know what I mean. The pseudo-abstract stuff which clutters so much of the contemporary art world contributes little to the spirit. Your work—although your sources were both simple natural situations and simple "junk"—possesses a direct quality of beauty which thoroughly transcends "subject." My congratulations! ( . . . )

I am very happy you exist. Photography is a better art because you exist. Can I say more? No! Please come out here and stay awhile with us. Again, thanks.

Ansel Adams


He's been incredibly copied since the very beginning. The trouble is that most of Ernst's imitators over the years have been photographically vulgar and obvious, and in a way that's reduced his work retroactively, which is a shame. But his own eye and sense of observation are undiminished. He just does it better than all of them.

– Elliot Erwitt


A writer should build sentences that are full of color and shadows. This is where painters and photographers can teach us so much. A writer can replicate the sounds of great composers or the feel of songs that move them, moving words around so that sentences bear a certain weight. So should writers look at photographs and seek to emulate the uses of light and color. Craft a sentence in the style of a photographer and see how the shapes change.

Ernst Haas taught me a great deal. His use of color is extraordinary, and he once took the camera of a child—a simple Kodak model—and created a typical, brilliant photograph. It is, he said, in the eye—the creative eye—and the means by which you capture it is quite beside the point. So whatever you write— and for whomever you write it—endow it with the most truth and artistry you can.

Haas is really remarkable. If you look at his work, you start to see elements of Richard Estes and George Tooker, two other artists you should be studying.

— Tennessee Williams – Interviewed by James Grissom, New Orleans, 1982

La Suerte de Capa, Pamplona, Spain 1956

La Suerte de Capa, Pamplona, Spain 1956

Traffic, New York 1957

Traffic, New York 1957

Wild Horses, Nevada 1957

Wild Horses, Nevada 1957

Swimmers, 1984 Olympics, Los Angeles

Swimmers, 1984 Olympics, Los Angeles

View fullsize Japan 1984
Japan 1984
View fullsize Bhutan 1974
Bhutan 1974


©2023 ERNST HAAS ESTATE

[2] -Saul Leiter
Wednesday 10.11.23
Posted by Progressive-Street
 

Saul Leiter by Batsceba Hardy

Which is Better? Black and White or Colour?

“One very important difference between color and monochromatic photography is this: in black and white you suggest; in color you state. Much can be implied by suggestion, but statement demands certainty... absolute certainty.” Paul Outerbridge

"I have done no color of consequence for thirty years! I have a problem with color—I cannot adjust to the limited controls of values and colors. With black-and-white I feel free and confident of results". Ansel Adams

__________________________________________________

[2] -Saul Leiter

Saul Leiter

or “There is another world, but it is in this one." W.B. Yeats

(December 3, 1923 – November 26, 2013)

“I spent a great deal of my life being ignored. I was always very happy that way. Being ignored is a great privilege. That is how I think I learnt to see what others do not see and to react to situations differently. I simply looked at the world, not really prepared for anything.”

View fullsize Saul Leiter Self Portrait c.1949
Saul Leiter Self Portrait c.1949
View fullsize Saul Leiter 1952 Self
Saul Leiter 1952 Self
View fullsize String (self portrait) c.1955 Saul Leiter
String (self portrait) c.1955 Saul Leiter

"Seeing is a neglected enterprise."

Leiter was born in Pittsburgh, Pennsylvania and studied to become a Rabbi. But at age 23, he left theology school and moved to New York City to become an artist, in 1946."

View fullsize saul_leiter_by_batsceba_d8tz14o-pre.jpg
View fullsize d8tz14i-ab6c359a-3a6c-4223-80ec-f01db3a36920.jpg
View fullsize d8tz14u-db8ee9ca-e194-476e-b68f-f671070cb410.jpg

He was then encouraged to pick up a camera by his friends Richard Pousette-Dart, an abstract expressionist painter, and W. Eugene Smith, a great photojournalist. So he was soon taking black and white pictures with a 35 mm Leica.

He developed his career by associating with other contemporary photographers such as Diane Arbus and, in the 1940s and 1950s, was an essential contributor to what came to be known as the New York School of Photography. But he deviated significantly from Diane’s style, finally finding his own way.

"I admired a tremendous number of photographers, but for some reason I arrived at a point of view of my own."

His early and most well-known photographs are in black and white. He blurred the subjects through the windows and framed the subjects with precise compositional choices. His black-and-white work was featured in the book "The New York School".

View fullsize 1_joanna.jpg
View fullsize saul-leiter-16.jpg
View fullsize leiter2.jpg

Although Saul Leiter was a successful fashion photographer in the 1960s, it wasn't until the 1990s that his coloured street works gained recognition. Leiter introduced colour into the world of Haute Couture, dominating the pages of Harper's Bazaar, Elle, and Vogue. However, his career in fashion was short-lived as he never found true satisfaction in it. Leiter lived a "Zen lifestyle" and never sought fame. He even claimed that deep down, he desired to avoid success.

View fullsize Saul Leiter Harper's Bazaar October 1960
Saul Leiter Harper's Bazaar October 1960
View fullsize Jean Shrimpton Photographed by Saul Leiter 1966, August
Jean Shrimpton Photographed by Saul Leiter 1966, August
View fullsize Saul-Leiter-Vogue-UK-September-1966-
Saul-Leiter-Vogue-UK-September-1966-
View fullsize ©Saul Leiter Foundation/Howard Greenberg Gallery
©Saul Leiter Foundation/Howard Greenberg Gallery
View fullsize ©Saul Leiter Foundation/Howard Greenberg Gallery
©Saul Leiter Foundation/Howard Greenberg Gallery
View fullsize ©Saul Leiter Foundation/Howard Greenberg Gallery
©Saul Leiter Foundation/Howard Greenberg Gallery

He was officially recognized as a “Color” author in 1957 at the MoMA in New York, during the conference “Color Experimental Photography in Color” and later in his life (his monograph Saul Leiter: Early Color was published in 2006), the general public discovered him and became known for his vivid, colour street photographs. The book showcases one hundred painterly images that pushed the limits of photography during the latter half of the twentieth century.

” I think I’ve said this before many times—that photography allows you to learn to look and see. You begin to see things you had never paid any attention to. And as you photograph, one of the benefits is that the world becomes a much richer, juicier, visual place. Sometimes it is almost unbearable—it is too interesting. And it isn’t always just the photos you take that matter. It is looking at the world and seeing things you never photograph that could be photographed if you had the energy to keep taking pictures every second of your life.”

He captures the vibrancy of life on the streets through his unique approach to form and his improvisational use of found colours and tones. None of his contemporaries (except Helen Levitt) have pioneered using colour like Leiter. In Saul Leiter's work, his mastery of colour is where the beauty and passion of his vision truly shine. Colour intensity is the most characteristic of his works. He employs painting techniques in his photography, using colour, shadows and detail to reveal the unseen. He was influenced by the intense colours of Abstract Expressionism and tried to bring to photography the chromaticism of this movement. He used every colour that the city offered.

Leiter expresses his artistic language of fragmentation, ambiguity and contingency through his art. His work is different because he ignores decisive moments of human intercourse and focuses instead on the "indecisive" moments - those in-between times when nothing much seems to be happening, but which resonate with a profound sense of interior drama. Human figures are always in his pictures, but rarely they are the “main characters,” the main subjects. They are depersonalized forms viewed through a filtering layer. Bold chromaticism, off-centre composition and frequent use of vertical framing are very important in his work.

Blue Skirt, 1950s

Foot on El, 1954

Leiter has redefined the parameters of the genre of the street. His unique visual grammar includes off-centre perspectives, compressed spatial dynamics, and the breaking up of frames in exciting and unpredictable ways. Leiter works in both black and white and colour, and his colour work is even more radical in its asymmetrical visual rhythm and defiantly unsaturated tonalities inspired by Johannes Vermeer. His signature style involves photographing through condensation-flecked windows, resulting in dreamlike, impressionistic images.

Leiter was an underrated master of photography and confirmed that the most significant artists are often the most humble and self-deprecating.

SAUL LEITER Package, 1960


Saul Leiter' fame quotes:

“I’ve never been overwhelmed with a desire to become famous. It’s not that I didn’t want to have my work appreciated, but for some reason — maybe it’s because my father disapproved of almost everything I did — in some secret place in my being was a desire to avoid success.”

“In order to build a career and to be successful, one has to be determined. One has to be ambitious. I much prefer to drink coffee, listen to music and to paint when I feel like it... Maybe I was irresponsible. But part of the pleasure of being alive is that I didn’t take everything as seriously as one should.”

“I am not immersed in self-admiration. When I am listening to Vivaldi or Japanese music or making spaghetti at three in the morning and realize that I don’t have the proper sauce for it, fame is of no use. The other way to put it is that I don’t have a talent for narcissism. Or, to put it yet another way, the mirror is not my best friend.”

"Some photographers think that by taking pictures of human misery, they are addressing a serious problem. I do not think that misery is more profound than happiness."

"My friend Henry [Wolf] once said that I had a talent for being indifferent to opportunities. He felt that I could have built more of a career, but instead I went home and drank coffee and looked out the window."

"I go out to take a walk, I see something, I take a picture. I take photographs. I have avoided profound explanations of what I do."

"When we do not know why the photographer has taken a picture and when we do not know why we are looking at it, all of a sudden we discover something that we start seeing. I like this confusion."


View fullsize 51bf299079415saul_leiter_purple_umbrella_1950_s.png
View fullsize pf106907-4f889293d8faa.jpg
View fullsize 60372_12499_taxi.jpg
02saulleiter_haircut1956.jpg
d854da56bbcc06373d52534393234255.jpg
pf106909-4f88958d83d79.jpg
red-umbrella-1958.jpg
shopping-ca-1953.jpg
saul-leiter-011-2.jpg

Paris, 1959

Screenshot 2023-10-03 alle 11.36.49.png
Screenshot 2023-10-03 alle 11.37.30.png

In the photograph "Walking" taken in 1956, both figures are blurry and seem to blend into their surroundings. The woman in the dark coat next to her lighter-dressed companion might be easily missed. The photographer is positioned inside, looking out, and the vertical reflections of different kinds make the scene complicated. It is impossible to determine the source of the reflection of the door or window that separates the subjects. The picture's vertical appearance is increased by visually compressed letters, F and E, seen in reverse. These ciphers float parallel to the light-coated woman like brackets indicating her head and middle body. Everything in the photo is uncertain and unstable, yet the components fit together to demonstrate that other levels of possibility and meaning can be discovered within every flowing moment if we pay attention. Leiter's images achieve this over and over again.


All Photos © Saul Leiter


Saul Leiter Self-Portrait with Inez c. 1947

 
Saul Leiter Foundation


DISCOVER the COLORFUL GENIUS of Saul Leiter: Exploring His LIFE and WORK


[1] Helen Levitt


Tuesday 10.03.23
Posted by Progressive-Street
 

Raghubir Singh by Shubhodeep Roy

In the quiet corner of an old, dusty bookstore, I stumbled upon a treasure that would alter the course of my life forever. I was just a curious 15 or 16-year-old, the world still unfolding before me, when I turned the pages of an aging book and embarked on an enchanting journey across the diverse tapestry of India. The book was a collection of photographs by Raghubir Singh, a name that would become synonymous with the artistry of color photography in my mind.

As my fingers moved across those yellowed pages, Raghubir Singh's photographs leapt out at me with an almost palpable vibrancy. Each frame told a vivid story of a nation bursting with colors and cultures, an India that was at once ancient and modern, complex and beautiful. In that transformative moment, my perception of photography shifted dramatically. It ceased to be merely about pictures; it became a gateway to exploration, a tool for understanding, and an art form for capturing life's most exquisite moments.

One photograph, in particular, etched itself into my soul—an image captured on a rainy day. It possessed an almost lyrical quality, and within its frame, I saw not just a frozen moment in time, but an entire nation encapsulated. "Monsoon Rains" was its title, a testament to the resilience of four women huddled together in an open field amidst a monsoon shower. Singh's genius lay not just in freezing this scene but in portraying the intricate interplay of colors and emotions, revealing the untold stories within.

It felt as if the very essence of India had been distilled into that single image. My fascination with Raghubir Singh deepened with each passing day. His magnum opus, "The Grand Trunk Road," became my window to a world I had yet to explore, a highway stretching from the heart of Bengal to the border of Punjab in Pakistan. It was a journey captured through Singh's lens, documenting the ordinary and the extraordinary, the beauty hidden in the mundane, and the stories etchedinto the faces of truck drivers, dhaba owners, and street laborers. Through his photographs, I saw not just the big picture of the world but a mosaic of the human experience.

My newfound passion for photography led me to the local bookstore time and again, where I would spend hours poring over Singh's work. The book was a luxury I could hardly afford, but the thirst for his artistry drove me relentlessly. It was within those pages that I realized the person I was before encountering his work and the person I became after were two entirely distinct beings. My perspective on my nation and its people underwent a profound metamorphosis.

Raghubir Singh's photographs weren't just pictures; they were portals to India's soul. They could be stark, bold, or profoundly poetic, offering me a glimpse of my country that was both deeply personal and universally resonant. Singh had an uncanny ability to distill the essence of India into each frame, and I was captivated by his vision.

Yet, it wasn't just his captivating imagery that drew me in; it was also his unyielding dedication to color photography. In a time when black and white photography reigned supreme, Singh dared to be different. He firmly believed that high-contrast black and white images couldn't capture the rich tapestry of life and color that defined India. Instead, he championed the use of color, drawing inspiration from India's cultural and spiritual heritage. To him, color wasn't just an artistic choice; it was a reflection of India's profound philosophy, deeply rooted in the cycle of rebirth.

Singh's pursuit of color photography was revolutionary. He documented India's multifaceted realities in a way that had never been seen before. His images offered a fresh perspective on the country, a fusion of vibrant street scenes and captivating narratives. Inspired by legendary photographers like Henri Cartier-Bresson, Eugene Atgèt, William Gedney, and Lee Friedlander, Singh crafted an Indian version of photographic modernism, challenging and redefining our understanding of the nation.

As I delved deeper into Singh's work, he became a guiding light in my photographic journey. I couldn't help but admire the man who embarked on a remarkable journey himself, traveling from Kolkata to the Pakistan border, documenting every inch of the Grand Trunk Road in an Ambassador car. His dedication to capturing the essence of India, with all its complexity and beauty, was nothing short of inspiring.

In the late 1960s, Raghubir Singh embarked on his career as a photojournalist for The National Geographic magazine. His journey was profoundly shaped by a soiled copy of Henri Cartier- Bresson's book, "Beautiful Jaipur" (1948), discovered in his parents' library. Singh's meeting withCartier-Bresson in Jaipur in 1966 marked a turning point in his life. He assisted the French photographer during several shoots, adopting and refining his aesthetic sensibilities.

While Singh's early work showcased compositional precision and discipline reminiscent of Cartier-Bresson, he firmly championed the use of color photography, a preference vehemently opposed by his mentor. Cartier-Bresson believed that black and white was the only medium for artistic expression, but Singh's argument for color photography was deeply rooted in Indian culture and spiritual heritage. To Singh, color was more than a choice; it was a reflection of the philosophical tenets of India's major religion.

His relentless pursuit of color photography was groundbreaking. In an era when color was dismissed as unserious by many photographers, Singh used it to document modern India's multifaceted realities. His images revealed a fresh perspective on the country, a blend of vibrant street scenes and captivating narratives. Inspired by the likes of Cartier-Bresson, Eugene Atgèt, William Gedney, and Lee Friedlander, Singh crafted an Indian version of photographic modernism, redefining our understanding of the nation.

Raghubir Singh's legacy endures as a pictorial atlas of India's cultural life at the close of the twentieth century. His handheld camera, color slide film, and unyielding dedication to capturing India's multifarious milieu bestowed upon us a wealth of photographs. They are complex, teeming with incident, fractured by reflections, and pulsating with opulent color. Each image tells a story, painting a vivid picture of a nation alive with tradition, diversity, and modernity.

As I reflect on my own journey, I owe a debt of gratitude to Raghubir Singh. His photographs continue to inspire me, reminding me that photography is more than capturing images; it's about storytelling, culture, and the profound beauty of everyday life. Raghubir Singh's work transcends time and place, leaving an indomitable mark on the world of photography and in my heart.

That serendipitous day in the dusty bookstore changed the course of my life, and it's a debt I can never repay. Raghubir Singh's photographs were more than pictures; they were the keys to a world waiting to be explored, understood, and shared. His legacy lives on, not only in the framesof his images but in the hearts of those he inspired to see the world through a different lens.

1.jpg
2.jpg
3.jpg
Screenshot 2023-10-01 alle 16.28.42.png

Some book suggestions by Raghubir Singh:

1. **"The Grand Trunk Road: A Passage Through India"** - This iconic book takes you on a visual journey along the historic Grand Trunk Road, capturing the essence of India's diverse landscapes and cultures.

2. **"A Way into India"** - In this book, Raghubir Singh offers a compelling exploration of India through his photographs, showcasing the country's rich traditions and contemporary life.3. **"Calcutta"** - Explore the vibrant streets of Calcutta through Raghubir Singh's lens, where every photograph tells a unique story of the city's people and their daily lives.

4. **"River of Colour: The India of Raghubir Singh"** - This book provides a comprehensive overview of Raghubir Singh's work, highlighting his mastery of color photography and his unique perspective on India.

5. **"Raghubir Singh's India: Reflections in Colour"** - A retrospective of his career, this book offers a deep dive into Singh's remarkable ability to capture the beauty and diversity of India through color photography. They are not only a visual treat but also a source of inspiration for photography enthusiasts and anyone interested in exploring the rich tapestry of India, They will take you into the world of Raghubir Singh, a masterful storyteller who painted India in color and left an indelible mark on the art of photography.

Shubhodeep Roy
Sunday 10.01.23
Posted by Progressive-Street
 

Josef Koudelka by Shubhodeep Roy


“I tried to be a photographer. I don’t know how to talk. I’m not interested in talking. If I have something to say, perhaps it can be found in my photos. I’m not interested in explaining things in saying “why” and “how.” - Josef Koudelka

As a photographer, I've always been drawn to the masters of the craft, those who don't just take pictures but tell stories through their lens. One such luminary figure who has profoundly influenced not only my work but the entire world of photography is Josef Koudelka. His journey into the realm of photography is far from conventional. He began his professional life as an engineer in Czechoslovakia before transitioning to photography in his late twenties. It was a pivot that would change the course of his life and contribute significantly to the world of visual storytelling.

Koudelka's photographic journey began in the 1950s when he was still a student, and he continued honing his craft while working as an aeronautical engineer. However, it was in 1961 that he truly embarked on his photographic career, capturing the lives of the Roma people in Czechoslovakia and the world of theater in Prague. By 1967, he had fully committed himself to photography.

"I try to be a photographer." These words resonate with anyone who has ever felt the magnetic pull of a creative passion. Koudelka's transition from engineering to photography reminds us that it's never too late to follow our artistic calling. It's a reminder that our true passions have a way of finding us, no matter where we start.

In 1968, Koudelka found himself thrust into a historic moment when he photographed the Soviet invasion of Prague. To protect himself and his family, he published these images under the initials P. P. (Prague Photographer). Despite the risks, he was anonymously awarded the Overseas Press Club’s Robert Capa Gold Medal for these photographs in 1969.

Koudelka's courageous act of documenting a pivotal historical event, even at great personal risk, speaks volumes about the power and responsibility of photographers. His images remind us that photography is not just an art form but also a tool for bearing witness and sparking change.

What sets Koudelka apart is his unique journey. His initial foray into photography through the theater allowed him to refine his technique and develop his signature stark, contrasty style. This experience provided both the technical and financial foundation he needed later to pursue his documentary work with the Roma people.

Koudelka's transition from photographing theater to documenting the lives of the Roma is noteworthy. It highlights the importance of diversifying one's photography skills by exploring different genres. Just as Koudelka's theater work enriched his abilities in documentary photography, other photographers can benefit from diversifying their experiences to become more well-rounded artists.

Another key aspect of Koudelka's approach is his reluctance to explain his photographs. He believes in letting the images speak for themselves, allowing viewers to interpret and create their narratives. This philosophy encourages a more engaging and open-ended interaction with his work, inviting viewers to connect with it on a personal level.

In a world often filled with noise and explanations, Koudelka's approach reminds us to trust our audience. To trust that viewers can derive their meanings and emotions from our work. It's a powerful lesson in the art of subtlety.

Koudelka's mastery of various lenses for different projects is also instructive. He adapted his equipment to suit the specific needs of each project, emphasizing the importance of choosing the right tools for the job. This flexibility and willingness to experiment have enriched his body of work.

In a world where gear often takes center stage, Koudelka's approach grounds us. It reminds us that the camera is a tool, not the creator. It's a lesson in resourcefulness and adaptability.

Furthermore, Koudelka's patient approach to photography is a valuable lesson. He allows his images to "marinate" over time, revisiting them and making deliberate, thoughtful decisions about their significance and placement. This patient editing process ensures that his final body of work is cohesive and powerful.

In an age of instant gratification, Koudelka's approach teaches us that great art often requires time and reflection. It's a reminder that our initial impressions of our work may not reveal its true depth.

Koudelka's enduring passion for photography, even after nearly seven decades, demonstrates that age should not limit one's creative pursuits. He views each day as an opportunity to capture meaningful moments through his lens. This unwavering commitment to his craft serves as a reminder to all photographers to keep their passion alive and stay open to new challenges.

“Many photographers like Robert Frank and Cartier Bresson stopped photographing after 70 years because they felt that they had nothing more to say. In my case I still wake up and want to go and take photographs more than

ever before. But I can see that a certain type of photography has come to an end because the subjects don’t exist anymore. From 1961 to 1966 I took pictures of Gypsies because I loved the music and culture. They were like me in many ways. Now there are less and less of these people so I can’t really say anything else about them.

What I can do is update projects like “The Black Triangle”, as that is about a specific landscape that doesn’t exist anymore. I can show how it was before and how it is now, so people realize what’s going on. That keeps me excited.” - Josef Koudelka

Living simply has been a fundamental part of Koudelka's life. His minimalistic approach to personal belongings and his willingness to live modestly allowed him to focus on his artistic endeavors without distractions. This simplicity not only eased his path as a photographer but also kept him grounded in his pursuit of visual storytelling.

In conclusion, Josef Koudelka's photography teaches us to make our work personal, to follow our passions, and to keep shooting. He encourages photographers to embrace simplicity, prioritize their creative journey over material pursuits, and allow their images to speak for themselves. Koudelka's legacy serves as an enduring source of inspiration for photographers, reminding us that the true essence of photography lies in the raw, unfiltered emotions it captures and the stories it tells.

At the end of the day, there are many lessons we can learn from his passion, hard work, and genius. But remember, at the end of the day– he didn’t pursue his photography for the money, fame, or to impress others. He photographed for the love of it and for himself.

**Recommended Books by Josef Koudelka**

1. "Exiles" - This book features Koudelka's stunning black and white photographs taken between 1968 and 1988, capturing the lives of various exiled communities. It provides a powerful visual narrative of displacement and resilience.

2. "Gypsies" - Dive into Koudelka's immersive photographic exploration of the Roma people's lives. Originally published in 1975, this work remains a significant contribution to the world of documentary photography.

3. "Chaos" - Josef Koudelka's "Chaos" presents a series of photographs taken between 1986 and 1997, capturing moments of upheaval and change in various European countries. This book showcases his mastery of visual storytelling during turbulent times.

4. "Wall: Israeli and Palestinian Landscapes" - Explore Koudelka's recent work that delves into the complexities of the Israeli-Palestinian conflict, both in terms of physical barriers and emotional divisions.


Sunday 10.01.23
Posted by Progressive-Street
 

Helen Levitt by Batsceba hardy

Which is Better? Black and White or Colour?

“One very important difference between color and monochromatic photography is this: in black and white you suggest; in color you state. Much can be implied by suggestion, but statement demands certainty... absolute certainty.” Paul Outerbridge

"I have done no color of consequence for thirty years! I have a problem with color—I cannot adjust to the limited controls of values and colors. With black-and-white I feel free and confident of results". Ansel Adams

__________________________________________________

[1] - Helen Levitt


Born – New York, 1913

Died – New York, 2009

Helen Levitt / © Estate of Helen Levitt


Helen Levitt was born in 1913 in a middle-class family of Russian-Jewish parents in Brooklyn, New York. She was one of the early pioneers of color street photography.

At the age of 18, she started her photography career by working in a portrait studio located in the Bronx. Her inspiration came from the works of Henri-Cartier Bresson, a French photographer, which led her to buy a 35-mm Leica camera. She then started exploring the impoverished neighbourhoods of her hometown, New York, to find subjects for her photography. She was fascinated by the games children played on Brooklyn's streets and enthusiastically captured their chalk drawings.

Helen Levitt: Walker Evans, New Yorkc. 1940

About 1938, she took her portfolio (photos of the children’s chalk drawings) to photographer Walker Evans’s studio and started to grow a friendship with him, James Agee, and their friend, the art critic Janice Loeb.


She hoped to break down injustices by showing that children from all backgrounds could play together, oblivious to the divided and crime-ridden world around them.

In 1959 and 1960, Levitt received two subsequent Guggenheim Fellowships and started to work in color to shoot the streets of New York City.

Unfortunately in 1970, a burglar stole almost all of her color slide film and print (few survived), but Levitt went out back to the streets and shots her best color work.

40 of her color street photos were shown as a slide show at the New York Museum of Modern Art in 1974, one of the first color photo exhibitions in an art museum.

In recent years Levitt gave up his faithful Leica to switch to a smaller automatic Contax.


I never had a ‘project.’ I would go out and shoot, follow my eyes —what they noticed, I tried to capture with my camera, for others to see.” – Helen Levitt

“It would be mistaken to suppose that any of the best photography is come at by intellection; it is like all art, essentially the result of an intuitive process, drawing on all that the artist is rather than on anything he thinks, far less theorizes about.” – Helen Levitt

“I decided I should take pictures of working class people and contribute to the movements. Whatever movements there were Socialism, Communism, whatever was happening. And then I saw pictures of Cartier Bresson, and realized that photography could be an art and that made me ambitious.” – Helen Levitt


Color Slide Film from Helen Levitt shot in NYC shot with a Guggenheim she received in 1959 and 1960. Recorded at the MOMA in NYC.

Levitt is recognized as New York's "visual poet laureate," offering a poetic interpretation of her environment without bias or preconception. Her photographs humanise her subjects in their unique and diverse authenticity.

Levitt is renowned for her impromptu photographs, which capture the raw authenticity of working-class neighbourhoods with a touch of theatricality. As a true pioneer of Street Photography, her work has undoubtedly influenced the genre of street photography. Many try to replicate the authentic moments Levitt was a master at capturing. Levitt suggested that images are open-ended, speaking of things beyond the frame.

Although her work falls under the category of social documentary, Levitt draws inspiration from the surrealist movement.

She was an early pioneer of the New York avant-garde movement, dabbling in film-making as well.

New York. 1959

NYC (Kids in Window) 1959

New York City, 1971

New York, 1971-74

New York, 1972

New York, 1974

New York, 1980

New York, 1981

NYC (Phone Booth) 1988

Monday 09.18.23
Posted by Progressive-Street
 

Night Bike Panning by Frans Kemper

Night Bike Panning

by Frans Kemper

After my fair share of regular bike panning images, this was a logical step (up). Night Bike Panning, in the rain if possible.

Basically, bike panning is pretty simple. Let me walk you through it. Relax; it does not get too technical.

First and foremost, you need a moving bike with one or more people.

Once you have got that, it's all downhill from there (pun intended)

Shutter speed... Fast enough to freeze the moving bike and said person(s) but slow enough to blur the background. Also, be careful with the flashing-fast electric bikes; they ruin everything. My advice: stay old school...

Aperture... Wide open, my default setting (f/1.7) leaves little chance of anything sharp. However, you also do not want to go too small with your aperture. You want a separation between the bike and the background. My advice: go a little smaller, but not too small either.

Background…A slow-driving car in the same direction doesn't help a lot. It also has to be far enough from the bike to create that blurry effect and, at the same time, that kinda 3-D effect, if you know what I mean… So my advice, ask the biker to come closer a little…

And then finally, aim for the coming up bike and pan in the same direction…When a biker is in or almost in front of you, gently press the release button…Pay attention; this is MOST important. After you click, keep on panning a little bit more with the object...

Now here is a little inside trick…Wear a funny hat…Yes…People will see you, and that's when you get the great (or not so great) reactions…

So, with regular bike panning under my belt, most of the time, I needed to try my hand at night bike panning… preferably in the rain…

Here and here are my earlier bike stories on this site.

Enjoy

Frans Kemper

View fullsize 4.jpg
View fullsize 5.jpg
View fullsize 2.jpg
View fullsize 7.jpg
View fullsize 21.jpg
View fullsize 6.jpg
View fullsize 15.jpg
View fullsize 8.jpg
View fullsize 11.jpg
View fullsize 1.jpg
View fullsize 9.jpg
View fullsize 12.jpg
View fullsize 13.jpg
View fullsize 14.jpg
View fullsize 17.jpg
View fullsize 16.jpg
View fullsize 3.jpg
View fullsize 10.jpg
View fullsize 18.jpg
View fullsize 20.jpg
View fullsize 19.jpg
Tuesday 02.21.23
Posted by Progressive-Street
 

Blur

Saul Leiter 'Snow' (1960) © Saul Leiter Foundation, Howard Greenberg Gallery

“I often think that the night is more alive and more richly colored than the day.”  Van Gogh   

“Memory blurs, that's the point. If memory didn't blur you wouldn't have the fool's courage to do things again, again, again, that tear you apart.”  Joyce Carol Oates   

“If you look carefully at life, you see blur. Shake your hand. Blur is part of life”  William Klein
   

BLUR, MOTION BLUR!!!


Motion is hard   you need to have a camera in S or M mode and setting the shutter to slower speeds, the shutter of your camera needs to be long opened enough to allow your camera’s image sensor to ‘see’ the movement of your subject, but: 

– If your shutter speed is too long, you lose too much detail in the shot. 

– If your shutter speed is too short, you don't capture the sense of motion. 

 There are 3 ways to get a feeling of movement in your images:   

 – have your subject move

 © Niall Strachan

– have your camera move   (or both)  

 © Simon Becker

– or using Slow Sync Flash


Flow-Like-the-Wind by  TOKYO COUNTRY BOY

 http://www.theinspiredeye.net/flash-street-photography/


 For capturing movement in an image you need to select a longer shutter speed, but of course also the speed of your subject and how much light there is in the scene come into play.   

 The key is to experiment    

***


MOTION BLURRY SUBJECT

WITH FOCUSED BACKGROUND

© Jan Rockar

© Arnaud Legrand

© Scott Norris


MOTION BLURRY BACKGROUND

WITH FOCUSED SUBJECT (PANNING)

@Siddhartha Mukherjee

© Lasse Damgaard

© Kierra Thorn

© Garry Winograd


Motion Blur with Rear Curtain sync Flash 

© Emilio Barillaro

“If you look carefully at life, you see blur. Shake your hand. Blur is part of life“

William Klein 

I photograph what I see in front of me, I move in close to see better and use a wide-angle lens to get as much as possible in the frame.' 'William Klein,  Close Up ' 

New York, 1955 - with a wide-angle lens

Klein preferred using a wide-angle lens (21mm-28mm) compared to something more standard like Henri Cartier-Bresson's 50mm: 'Does it really bother you? In any case, I'm not deliberately distorting. I need the wide angle to get a lot of things into the frame. Take the picture of may day in Moscow.
 With a 50mm jammed between the parade and the side-walk, I would have been able to frame only the old lady in the middle.
 But what I wanted was the whole group, the tartars, the Armenians, Ukrainians, Russians,
 an image of empire surrounding one old lady on a sidewalk as a parade goes by.' 'In photography, I was interested in letting the machine loose, in taking risks, exploring the possibilities of film, paper, printing in different ways, playing with exposures, composition and accidents. It’s all part of what an image can be, which is anything. Good pictures, bad pictures - why not?' In the '50s, Klein had to fight against many "taboos" shooting in the streets: grain, high-contrast, blur, resolution, and accidents. He used these taboos to create his language, his "techniques", full of energy and rebellion.
 

Dance in Brooklyn, New York, 1955

Tokyo

Tokyo

In a 1981 interview: 'In the 1950s I couldn't find an American publisher for my New York pictures [...]  Everyone I showed them to said, 'Ech! This isn't New York, too ugly, too seedy and too one-sided. They said 'This isn't photography, this is sh*t!'

I came from the outside, the rules of photography didn't interest me... there were things you could do with a camera that you couldn't do with any other medium... grain, contrast, blur, cock-eyed framing, eliminating or exaggerating grey tones and so on. I thought it would be good to show what's possible, to say that this is as valid of a way of using the camera as conventional approaches. - William Klein  


Friday 04.15.22
Posted by Progressive-Street
 

ALEXEY TITARENKO by Irina Escoffery

As a street photographer who wants to evolve and thrive to perfection, I am constantly browsing the internet in search of talented photographers. I then analyze and look closely into their work trying to learn their techniques and then applying it to my own work. This is how I discovered absolutely amazing and magic world of Alexey Titarenko. It’s not that his photography was unknown to the large public. He is a very recognized and famous photographer. But for me, it was a shocking discovery of his untraditional and very unique vision into the world that was very familiar to me. I started to read about his work and his artistic experiments. I was astonished by how similar my life experience was.

 I shouldn’t be surprised by this though because Alexey and I are coming from the same generation of post-Soviet people who survived Perestroika and kept our nostalgic love to the turbulent time of the USSR. His love is strongly felt especially in his magnificent project named “City of Shadows”.  

Alexey shares his memories of childhood. “During the sixties, my family had a small room of fifteen square meters in a communal apartment in Leningrad (now Saint Petersburg). There I lived with my parents, grandmother, and aunt, who was then a student. I often disturbed them, mostly at dawn, because I woke very early and didn’t know how to keep myself occupied. The morning wait was unbearably boring — each moment seemed as long as a lifetime. To put an end to this situation, the adults taught me how to read. Reading affected me profoundly, stimulating my imagination and sensibility, giving me the desire to dream and especially to dream while taking walks. Reading also altered my vision of the surrounding reality, endowing it with mystery and intrigue.”( http://www.alexeytitarenko.com/essay).  

Reading this I can relate to his memories because it is exactly how I grew up in the communal apartment sharing the kitchen and the bathroom between the other five families living in the same apartment. Like Alexey, I also started reading books at a very early age and possessed a very strong imagination that often got me into trouble.

Alexey was very lucky to discover photography at a very early age. He was 9 years old when he received his first camera as a present and learnt photography in the local photography club for children.  

Alexey was born and grew up in Saint Petersburg, a majestic and poetic city with a very strong cultural atmosphere. One of the greatest Russian writers  Fyodor Dostoevsky described Saint Petersburg in his masterful novels. Alexey was very influenced by Dostoevsky literature. He saw the city with Dostoevsky eyes and his main, most powerful photographic work was also dedicated to Saint Petersburg.  


Dostoyevsky was one of the writers who sparked my desire to discover this hidden facet of things. After reading Poor Folk, Humiliated and Insulted, and Crime and Punishment, I was most attracted to the types of buildings where his characters lived: labyrinthine courtyards with multiple entries—sometimes with walls so high and narrow that you seemed to be in a well, dilapidated stalls, and places where the marginalized society was found, alcoholics, tramps. Leningrad, its historical sides and in particular Vasilyevsky Island, where I lived, was filled with such people. I spent entire days exploring such places” http://www.alexeytitarenko.com/essay).

Classical music had an enormous influence on Alexey’s artistic process. He remembers how he was listening to Bach, Mozart, Beethoven, Brahms and Tchaikovsky while working on his project about Saint Petersburg. Shostakovich music had an especially powerful impact on Alexey’s photography. I literally can hear the majestic accords of the Shostakovich symphony looking at Alexey Titarenko “City of Shadows”.

As tragic and dramatic the time of Perestroika was for the destiny of the entire generation of Soviet people, this particular time was in my opinion when the photographic talent of Titarenko flourished and attained the level that was never achieved by anyone in the entire history of Russian photography. He could show the tragedy of the people’s broken hopes and false illusions. Each of his photographs is filled with bitter sentiments and shattered expectations.

“The years passed. People wearied of this interminable descent into hell. The situation continued to worsen. Added to the shortage of necessities was the collapse of the healthcare system. Retirement became nonexistent. People vanished, as if they had secretly emigrated, or died. Crime invaded the city and spread. By the middle of the 1990s, Saint Petersburg was perceived more as a capital of organized crime than as a cultural centre; a television series, Gangster Petersburg, was broadcast on a national channel. Like others, I was depleted and disappointed. Hopes raised after the fall of the USSR had not been borne out. Slowly, however, the survival instinct compelled me to search for things that could bring some sort of moral respite, if only briefly” (http://www.alexeytitarenko.com/essay).

Looking at these photos I can see myself in this crowd of devastated people who sell cigarettes to buy food.  

His work is very personal to me because my fate is very similar to the fate of millions of Russian people who had to go through all circles of hell to be reborn. Titarenko’s work reflected it on a very profound level.  

Shostakovich music raises up in crescendo to the unseeing tsunami waves of human desperation and untold catastrophes.

 
Irina Escoffery


Sunday 02.06.22
Posted by Progressive-Street
 

Tricky Techniques with a Smart Phone Camera in Tokyo by Lukasz Palka

A a quick vid about getting the most out of the camera on your smartphone. Check it out!

While exploring Tokyo's Kabukicho district, Lukasz and Chica experiment with using their phone cameras to get a unique perspective on the neon lights of Tokyo. In this short vid, you'll learn how to use the small camera lens on your phone to your advantage by getting extremely close to a reflective surface. The results speak for themselves!

EYExplore

Monday 10.28.19
Posted by Progressive-Street
 

Just Stick it in There - Thinking Outside the Box with Escalators

Join Lukasz in Shiodome as he teaches you an easy trick to get a fascinating and dynamic architectural shot. Lukasz goes into the details about how to set up the camera before telling you to 'just stick it in there.' There are some other interesting details that he goes into, specifically how fluorescent lights can affect the colors of the photo if you're not careful with your shutter speed. Check out the video for all of the details! EYExplore: https://www.eyexplore.com/ EYExplore Blog: https://www.eyexplore.com/blog/ Instagram: https://www.instagram.com/eyexplor/ Facebook: https://www.facebook.com/eyexplore/ Lukasz's Instagram: https://www.instagram.com/lkazphoto/

Tuesday 09.24.19
Posted by Progressive-Street
 

How to Create Negative Space - Street Photography Tutorial

Join Lukasz and Chica in a district rich with architecture and visually interesting locations as they play around with the concept of negative space in street photography. This is just one interesting way to use the environment in order to isolate the subject. Lukasz goes into the exposure settings, tips on autofocus, and even touches on white balance in an urban setting.

EYExplore: https://www.eyexplore.com/

Tuesday 09.24.19
Posted by Progressive-Street
 

WHERE SHOULD I FOCUS?

1.jpeg

WHERE SHOULD I FOCUS?

by Lukasz Palka

Focused on the crossing barrier with a medium aperture (f/5.6) which allows enough DOF to keep the train in focus as well


A common question we get on our photo workshops is ‘where do I focus?’ When the subject is obvious the answer is easy—focus on the subject! But this question more often comes up in the context of urban landscape and architecture photography. So, let’s narrow the focus of this article to that genre and go into some focusing techniques as well.

FIRST A BIT ABOUT DEPTH OF FIELD

To answer the question of where to focus, we must first understand Depth of Field, or DOF. A quick overview of DOF: the aperture setting affects how much of the scene will be in focus. A common misconception (held surprisingly often by clients on our workshops) is that some apertures are used for close focusing and others are used for focusing on distant objects. This is incorrect! Any aperture can be used to focus at any distance. Instead, what the aperture affects is how ‘deep’ the focus is.

Essentially, a wider aperture (smaller f number, such as f/2) will result in a shallow DOF. A narrower aperture (bigger f number, such as f/16) will result in a deeper DOF. Keep in mind that ‘deeper’ does not mean farther ‘away from the camera.’ Rather, it means farther away from the point of focus.

The second thing that affects DOF is the focus distance that the lens is set to. For example, if I focus on an object 30 centimeters in front of the camera, the DOF might be from 28 centimeters to 36 centimeters. This means the focus area is only about 8 centimeters in depth. However, if I focus on an object 5 meters away, the DOF might be between 2 meters and 8 meters, resulting in a DOF of 6 meters. Keep in mind, this is regardless of the aperture setting—the closer you focus, the narrower the DOF will be.

Of course, these two effects operate simultaneously. Meaning that if we focus close and use a wide aperture then then the DOF will be razor thin—only a few centimeters. However, if we focus far away and set a narrow aperture, then the DOF might be many tens of meters in depth. For a landscape photograph (urban or otherwise), this second circumstance is usually ideal!

So, with all that, we can deduce where to focus if we want to maximize DOF for urban landscapes—on an object rather far from the camera. However, there is a bit more to it, and for that we should think about how the camera focuses.

Focus on the subject in the balcony — a small aperture (f/5.6) ensures that the background is also in focus

Focus on the subject in the balcony — a small aperture (f/5.6) ensures that the background is also in focus

WHAT CAMERAS FOCUS ON BEST

Modern cameras focus using one of two systems: phase detect or contrast detect. I will not go into the technical details or the merits of each system. All you need to know is that these methods work better when focusing on details or areas of high contrast. The easier to discern those details are, the more accurately and quickly the camera can focus.

Examples of great focusing targets are signs, text, brick walls, road markings, repetitive patterns, and so on. What all these things have in common is distinct areas of contrast. Some less than stellar focusing targets are trees, bright lights, neon signs, glass, fuzzy things, etc. These objects all lack some definition and have features that blend together even at different distances. The worst things to focus on have uniform colors and lack details, such as bare asphalt, single-color surfaces, empty patches of sky, glowing surfaces, and so on.

Obviously, all cameras are a bit different and some handle these things better or worse. But in general, try to focus on high contrast areas in the image. Combining what we learned above about DOF, we also know that these areas should be a good distance from the camera.

All that should give you a good idea of where to focus, but let’s go beyond that—manual focus.

Focused manually in live view mode — specifically targeting the large box-shaped water tank just upper right of center

Focused manually in live view mode — specifically targeting the large box-shaped water tank just upper right of center

MANUAL FOCUSING WITH THE LCD SCREEN

Auto-focus is great on most cameras these days, but when I’m using a tripod I like to focus manually. The reason is that I can be 100% sure that the focus is perfectly accurate, and I get enjoyment out of slowing down and doing things manually. However, most cameras these days are not so manual focus friendly when using the viewfinder (old cameras had split prisms in the viewfinder to aid manual focusing). On the other hand, digital cameras are great for manual focusing when using the LCD in live view mode.

On most mirrorless cameras, you already have the image on the back LCD, but on SLRs you’ll have to go to live view mode. Once you’re looking at the photo on the back LCD, you can zoom in the picture. This does not mean zooming with the lens, but rather zooming the picture itself. Most cameras have a dedicated button which allows you to do this (look for a pair of buttons with + and - symbols).

Once you zoom in the picture, you should also be able to move the image around. Find an object with details and contrast, such a railing, a sign, or a post in the part of the scene where you want to focus. Then, make sure you’re on manual focus, and simply turn the focusing ring on the lens. I recommend doing this with the aperture wide open (at its lowest setting, i.e. the smallest f number). This way you can really see the focus change as you rotate the focusing ring. Once you’ve set the focus, you can set your aperture back to f/8 or f/11 (or whatever aperture is needed for the shot). And that’s it! Tack sharp focus done manually—shoot away to your heart’s content.


Focusing on the utility pole, with all its details, is most accurate

Focusing on the utility pole, with all its details, is most accurate

TL;DR — SO, WHAT’S THE GIST OF IT?

Okay, okay… so, to recap, when shooting an urban landscape scene, I tend to focus on objects that are far away from the camera, but not necessarily the farthest objects. I also choose to focus on objects with lots of contrast and details that are easy to distinguish. Whether focusing manually or automatically, high contrast details make focusing easier and more accurate. And in general, when shooting on a tripod, I prefer manual focus with the aid of the LCD screen. If you want to learn all this and more, just join EYExplore's Tokyo By Night Photo Adventure. Now get out there and challenge your eye!

Breaking the rules — focus on the foreground for effect

Breaking the rules — focus on the foreground for effect

 
Lukasz Palka (Photo by Stéphane Bureau du Colombier)

Lukasz Palka (Photo by Stéphane Bureau du Colombier)

 
LCI
Thursday 12.13.18
Posted by Progressive-Street
 

LONG EXPOSURES — 6 TIPS AND TRICKS

1.jpeg

LONG EXPOSURES

by Lukasz Palka

Settings — 13 seconds, f/16, ISO 100

I wanted to expand upon my last two posts regarding long exposure night photography. But Instead of going into depth on another central aspect of this kind of shooting, with this post I want to cover a few specific tips and tricks that are a bit more on the technical side of things.

TURN OFF VR / OS / OIS / STABILIZER

First off, a simple tip and a word of caution: turn off picture stabilization. Lots of cameras these days can try to reduce vibration in order prevent motion blur at lower shutter speeds. When shooting in low light conditions, shutter speeds can get a bit slow, and the camera will use a moving element in the lens or in the body in order to stabilize the image, preventing blur.

Image stabilization is great when you’re shooting by hand, but not so great when the camera is on a tripod. Though some of the newer cameras are smart enough the deactivate this function when they are stationary, it’s a good idea to turn this off completely when doing long exposure photography. Some cameras have a physical switch on the lens for this function, while others have the option buried in the menus. Of course, once the camera is off the tripod, be sure to turn this back on as it’s a very useful function in most situations.

Settings — 15 seconds, f/22, ISO 200

Settings — 15 seconds, f/22, ISO 200

NOISE REDUCTION

Why does the camera sometimes say ‘Processing’ after taking a long exposure photo? (Some cameras don’t say anything, but simply keep the screen black for a few seconds after the shot.) A common misconception is that the memory card is slow or there is a lot of data to write after a long exposure.

To the contrary, the real reason has to do with noise reduction. Most digital cameras these days will perform a special kind of noise reduction to long exposure photos (typically photos longer than 1 second). When taking a multi-second exposure, the might end up with what’s known as ‘hot pixels’—pixels that get overly saturated and produce pure white dots in the image.

To remove these hot pixels, the camera will take a second ‘photo’ immediately after the actual shot. For example, if you do a 4 second exposure, after the photos is taken the camera will close the shutter and then take another ‘black’ photo with the shutter closed. This second exposure has to be the same length as the original shot. So, a 10 second exposure means a 10 second processing time.

What the camera does is it maps out the hot pixels and then subtracts them from your photo, resulting in a clear, noise-less image. Now, if the processing time is a problem most cameras allow you to turn off this feature, often labeled ‘long exposure noise reduction.’ However, I generally do not recommend turning it off, as this kind of noise is very difficult to properly fix in post.

Settings — 5 seconds, f/8, ISO 200 — composite of 4 frames

Settings — 5 seconds, f/8, ISO 200 — composite of 4 frames

FOCUSING: FIRST AUTO, THEN MANUAL

(OR JUST BACK-BUTTON FOCUS)

Auto-focus generally does a good job on most cameras when shooting urban landscape photos. However, sometimes there tends to be a lag which can cause problems when perfect timing is required. And anyway, while the camera is stationary on a tripod, focusing again and again every time you take a shot is rather tedious. Therefore, a simple and effective technique is to focus automatically one time, then switch to manual. This way the focusing is done by the camera once and then locked once you switch to manual. Just be sure to put it back on auto when you recompose your shot or move to a new spot.

More advanced users might also prefer to use ‘back button focusing’ (which is what I personally always use). Some cameras allow you to change which button activates focus. Typically, the same button that releases shutter is also responsible for activating the auto-focus. On my camera, I’ve set another button on the back side of the camera to activate focusing, while the shutter release does only one thing—it takes the picture. This is useful for urban landscape photography as I can focus once with the back button and then take as many shots as my heart desires without having to focus again.

Lots of photographers use this technique, but at first it does take some getting used to. I tried it for a few weeks, gave up for a while, tried again, and then finally fell in love with back button focusing. Give it a shot!

Settings — 5 seconds, f/11, ISO 200 — Zoom Blur

Settings — 5 seconds, f/11, ISO 200 — Zoom Blur

ZOOM BLUR

Zoom blur is a fun and easy technique that can result in stunning images. It’s very simple once you get the hang of it. Let’s say you’re doing a 4 second exposure of a cityscape. If you have a zoom lens, start zoomed out (the widest end of the zoom range), press the shutter release so the camera starts taking a photo, and then simply zoom in all the way. The resulting photo will be blurred towards the center of the image. This is called a zoom blur.

That’s really all there is to it. Try experimenting with different exposure times and different rates of zooming. You can also try to start zooming first, then releasing the shutter while you’re already zooming. Another way is to zoom in stages, stopping for a moment every second, resulting in another effect. The point is to just have fun with this simple trick!

COMPOSITING IN PHOTOSHOP

I have one last thing to help you create rich and vivid urban long exposure photos: compositing. If you’ve taken some long exposure photos of traffic, but the number of light trails in any single photo is a bit lacking, then you can try compositing them in Photoshop. In short, you should have a few identically composed shots (meaning that the camera did not move between shots) and then stack them up in multiple layers. In Photoshop, you can open your photos in a stack by going to File > Scripts > Load Files into Stack… Once there, be sure to select ‘Attempt to automatically align source images’ in order to ensure that everything is aligned properly.

Once the photos are open and stacked in layers, simply select all the layers and change the blend mode to ‘Lighten’. This will allow only the lighter parts of each image (mainly the light trails) to show through the whole stack of photos, effectively compositing all the light trails. That is the gist of it, though there is a lot more to this technique to pull it off really perfectly, but that’s a whole other post for another day. :)

I hope these 5 tips help you when shooting urban long exposures in Tokyo or anywhere in the world. Remember, we cover all this and more on EYExplore's Tokyo By Night Photo Adventure, so please check us out if you happen to be in Tokyo! Good shooting and as always… challenge your eye!

Saturday 08.18.18
Posted by Progressive-Street
 

LONG EXPOSURES — TWO APPROACHES

LONG EXPOSURES TWO APPROACHES

by Lukasz Palka

Settings — 6 seconds, f/11, ISO 100

Over my years shooting digital long exposures of the neon nightscape of Tokyo, I found that there are two basic approaches. One is to shoot as long as possible with as much traffic as possible, while the other is to shoot relatively short exposures while exercising excellent timing. For the basics on this kind of shooting, refer to my previous post on long exposure photography. You can also book EYExplore's Tokyo By Night Photo Adventure to learn all about long exposures in Tokyo.

THE LONG APPROACH

The common strategy for urban long exposure photography is to shoot for as long as possible to get many cars and other moving elements into the shot. This is usually best done from an elevated location looking over a large area such as a highway or multi-lane road, which can accommodate a lot of traffic.

An example of this approach would be to use the following settings: f/11, ISO 100, and an 8 second exposure. This is a typical setting that works in the well-lit streets of Tokyo. If this is not long enough the exposure can be lengthened to 30 seconds with a 2 stop ND filter, for example.

The long strategy makes sense when we are photographing an open stretch of road with cars moving a good distance away from us. By shooting for 8 seconds as in the above example, we would get longer light trails. In addition, the lengthy exposure might allow lots of traffic to pass through our frame. This means that multiple cars will layer on their own individual light trails, resulting in a vibrant and striking image.

Settings — 6 seconds, f/8, ISO 100

Settings — 6 seconds, f/8, ISO 100

A CRUCIAL CAVEAT

There is one challenge with the long approach—it requires lots of traffic to ensure that there are cars passing through the shot during most of the exposure. If you only get one car passing through the scene you might end up with a single long, but feint, light trail. This not ideal. For that, we must change strategies.

Settings — 1 second, f/11, ISO 100

Settings — 1 second, f/11, ISO 100

THE SHORT APPROACH

Faced with the problem of low traffic, one might be tempted to give up. But there is another way: we can get close to the road, and reduce our shutter time to around 1-2 seconds. With perfect timing, solitary cars are enough to leave rich and vivid light trails. The lights and reflections on the body work of the cars take on a textured, fluid-like appearance.

For example, if we take our previous settings from the above example (f/11, ISO 100, 8 seconds) and reduce the time to 2 seconds, we have made a 2 stop change. Each stop, reduces the light by half, so we went 8 seconds > 4 seconds > 2 seconds. Assuming our exposure was correct, we would have to compensate with either ISO or aperture (or both), so our resulting settings might be f/8, ISO 200, 2 seconds. We increased the exposure via the aperture by 1 stop (changing from f/11 to f/8 is a 1 stop increment) and then we increased our ISO by 1 stop (doubled from, 100 to 200). This results in a 2 stop total change.

Settings — 1 second, f/8, ISO 400

Settings — 1 second, f/8, ISO 400

ENOUGH WITH THE NUMBERS… WHAT DOES ALL THIS MEAN?

Walking through an exposure calculation is good mental exercise, but the key takeaway is that relatively short exposures works very well when shooting close to the passing cars. Timing their entry into the frame is crucial, but the resulting photos can be very dramatic. I used a 2 second exposure in my example above, but other times can work too, such as a 1/2 second or even 4-5 seconds. The key is that the solitary car should be in your frame for the same amount of time as your exposure. This obviously depends on the speed of the car, so once again timing is crucial.

Next time you’re out shooting long exposures in the city, try the two strategies covered above: shooting lots of traffic for long shutter times from a great distance, and shooting close for only 1-2 seconds and timing individual cars passing in each frame. With practice, you’ll see the difference and you’ll be able to decide which approach works best for each situation.

Settings — 2 seconds, f/8, ISO 100

Settings — 2 seconds, f/8, ISO 100

Saturday 08.18.18
Posted by Progressive-Street
 

LONG EXPOSURE PHOTOGRAPHY — BASIC HOW TO

1.jpeg

LONG EXPOSURE PHOTOGRAPHY

by Lukasz Palka

Settings — 15 seconds, f/16, ISO 200

Have you ever wondered how to get a night shot of the city with intense, fiery light trails? Well then read on my friends! This blog post is for those who want to learn how to shoot long exposure shots from the basics, as well as those of you who have already joined EYExplore's Tokyo By Night Photo Adventure and want to recap the settings and techniques you already learned.

THE BASICS

In order to get into the deep end of long exposure night photography, let’s review the basics of a camera: shutter, aperture, and ISO.

SHUTTER

The shutter setting allows you to control how long the shutter stays open, and therefore how much light comes into the camera. The secondary effect of the shutter time is motion blur. The longer the shutter, the more motion blur you can get.

APERTURE

The aperture is an iris inside the lens that controls how much light comes into the camera. We can make the aperture big (e.g. f/2.8) or small (e.g. f/16). The secondary effect of the aperture is its influence on the depth of field (DOF). For our purposes, all we need to know is that it gets deeper (more things are in focus) with a smaller aperture (e.g. f/11).

ISO

The ISO setting can be thought of as the ‘sensitivity’ of the camera’s sensor (or the film, if you’re using an analog camera). Essentially, the higher the ISO the more ‘sensitive’ the camera, which effectively means you’re getting ‘more’ light. In reality, a digital camera doesn’t quite work quite like this on a physical level, but for our purposes, this is a very convenient shorthand. The side-effect of the ISO is that the higher it goes the more noise or grain will be present in the resulting image.

Essentially, all three main functions (shutter speed, aperture value, and ISO) primarily affect how much light you end up with in the camera, while each of them also have a secondary effect.

Settings — 8 seconds, f/11, ISO 50

Settings — 8 seconds, f/11, ISO 50

HOW TO SET THE CAMERA…

With the basics out of the way, let’s move on to the settings we need for a typical night time long exposure shot in the city. Our goal is to keep our shutter open for as long as possible in order to allow the traffic to leave nice long trails of light in our photo. Let’s go with a typical shutter speed for this purpose: 4 seconds. This means the shutter stays open for 4 seconds to capture light, which is quite a long time. If we do not consider our other 2 settings carefully, then we will be left with an overexposed photo. In most shots on our photo adventure in Tokyo, this means we need to make the aperture smaller and reduce the ISO.

A good aperture setting for this shot could be f/11 (remember—a bigger aperture number means a smaller aperture). At this aperture, we have reduced the amount of light coming into the camera considerably. The secondary effect is that we also have a wide Depth of Field, meaning more things are in focus. This is perfect for a cityscape shot.

Next, we need to consider our ISO setting. We are trying to compensate for the large amount of light coming in during our 4 second exposure, so we need to keep the ISO quite low. Most cameras these days can do 100 ISO at the lowest. Going with the lowest ISO also has the added benefit of reducing noise / grain in the photo.

Settings — 2.5 seconds, f/11, ISO 100

Settings — 2.5 seconds, f/11, ISO 100

SUMMARY

So, let’s recap the settings for a typical night long exposure photo: 4 second shutter, aperture f/11, and ISO 100. And that’s it! From there you might adjust the aperture a bit (say between f/8 and f/16) and work on the shutter time, anywhere from 1 second to 15 seconds depending on how much light is in the scene.

Settings — 6 seconds, f/11, ISO 50

Settings — 6 seconds, f/11, ISO 50

Saturday 08.18.18
Posted by Progressive-Street
 

MASTERING MANUAL FOCUS by Lukasz Palka

manual+focus+-+photo+4.jpg


Mastering


manual focus

by Lukasz Palka

Have you ever cursed your camera for missing that special moment in the streets? Do you ever struggle to get the subject quickly in focus before the fleeting moment is lost forever in the aether? Well then why not try manual focus? Below is a brief guide to a few key manual focus techniques that can help you capture the decisive moment.


PRIME LENSES

Before we can look at the benefits of manual focus, we first have to discuss the use of prime lenses. The reason prime lenses have become a staple of street photographers is simple: speed. Without the need to select a focal length, and forcing yourself to work with one field of view (FOV), you can drastically reduce the time necessary for framing the subject. Of course, the single focal length puts a constraint on what the photographer can do. It also forces us to use our feet. You might think this can slow things down, and zooming would allow you to change framing more quickly. However, by practicing with the constraint in place, proper positioning becomes second nature. As with the rest of the techniques described in this article, the goal is to make the technique automatic, and therefore, fast.

I don't feel it's necessary to go on with the upsides of prime lenses, since most of you are already converts, or even started out on fixed lenses. So on to manual focusing!

manual+focus+-+photo+2.jpg

MANUAL FOCUS, ZONE FOCUSING, AND HYPER-FOCAL DISTANCE

Manual focus might seem like a daunting prospect, but it is not as difficult as it sounds and it can really open up many possibilities when it comes to street photography. The main advantage of manual focusing over auto-focus is speed. Yes, it can be faster to manually focus rather than letting the camera seek focus automatically, regardless of whether you're shooting with a high grade camera body or not (sports photography, certain wildlife photography, etc. are exceptions due to the erratic motion of the subjects). This is especially true in good light because it allows shooting at f/8 or f/11. At small apertures the depth of field, or DOF, becomes large. Also, with sharp lenses, one does not need to nail focus exactly on the subject. Even if focus is slightly off, the subject will be sharp due to the large DOF. When using auto-focus, the camera will search for perfect sharpness which increased the time required to focus.

With practice, one can very quickly guess the approximate best focus with great speed and accuracy. In addition, depending on the auto-focus settings (matrix, spot, etc.) the camera might not focus on the desired point in the frame. The photographer has more control over what should be in focus, and most importantly can make the decision more quickly with manual focus. There's no need to mess around with focus select points and little joysticks on the back of the camera body. Selecting the focus point happens instantly in your mind.

But this isn't the real advantage of using manual focus. Modern AF systems have come a long way, and can nail focus on eyes and faces even in extreme conditions. The real advantage comes with having the focus already setting before you even know what your subject is. Then there is no need to focus at all.

manual+focus+-+photo+1.jpg

To achieve this, we can use a technique known as zone focusing. We can select a 'zone' between various focus ranges, say between 3 meters and 5 meters. Then you position yourself in such a way as to keep the subject in that range. You can also take advantage of the large DOF at high apertures, such as f/8, and maximize it to the point that no focusing is necessary beyond a certain range.

This is how it's done: all manual focus lenses have a gauge depicting the DOF at small apertures. It will look something like this:

Senza titolo.jpg

On the focusing ring, the focal distance is depicted in meters (and feet), with infinity marked by ∞. It looks like this:

Senza titolo 2.jpg

So together the two scales look like this:

Senza titolo 3.jpg

For example, at f/8 we can set the focus such as to place 5m at the left '8' mark, like this:

Senza titolo 5.jpg

This gives us a focus zone between 5 meters and 3 meters. That's a pretty big area in which everything will be in sharp focus. You might think it's difficult to consistently place subjects within this range, but you'd be surprised how quickly you can learn the effective focus range of a particular favorite lens. This is also where prime lenses become a key to the techniques. It can be done with a zoom lens, but the varying POV makes it difficult to instantaneously frame the subject as desired, which mitigates the speed advantage of zone focusing.

We can also take this one step further. Say we set the aperture to f/11 and set the focus such as to place infinity at the left '11' mark, like this:

Senza titolo 6.jpg

Now everything from infinity down to ~2 meters will be in focus at f/11. So, as long as we keep the subject more than ~2 meters away from the camera, the subject will always be in focus. In fact, everything beyond ~2m will be in focus. In this way, we have entirely eliminated the need for focusing in bright lighting conditions! This is known as 'hyper-focal distance.'

Of course, we don't always shoot in bright light. Sometimes we need to stop down to f/2 or less. In this case, hyper-focal distance is not a viable option, but zone focusing is still effective. Say you set you focus to 5m at f/2. The zone has become quite small, being as small as a 1-meter-deep ‘zone’ approximately 5 meters away from the camera. However, by consistently practicing with the same prime lens, you can even learn to shoot from the hip with this technique and get razor sharp results.

download.jpeg

SHOOTING FROM THE HIP AND QUICK DRAW

Once you take advantage of zone focus and hyper-focal distance you can easily draw the viewfinder to your eye, compose, and release the shutter, without taking any time to focus. In addition to this, you can even shoot 'from the hip', that is, without looking through the viewfinder. At first, this might look like a way of simply getting lucky. However, with the assumption that a prime lens is being used, you can learn that particular lens' field of view. With practice, you can predict what will be in the frame without even looking through the viewfinder. This is very difficult to master, and I don't suggest that anyone relies on this technique exclusively. But, I believe it can be a useful tool in your photographic toolbox. Finally, being forced to memorize the lens' field of view, allows for very fast composition and subject placement. In conjunction with zone focusing, this technique allows split second decision making: crucial when capturing the decisive moment!

And this of course is the crux of it all: you want to be absolutely ready to capture the moment without hesitation when it happens. The above techniques, with a lot of targeted practice, can help you do so.

I’ve included some photos that I took by using these methods. In fact, I feel that I would not have been able to get these shots had I not used manual focus.

Of course, I understand that manual focus is not for everyone, and not for every situation. But it can be a very useful skill as well as a fun new way to shoot in the streets.

Lukasz Palka: Web Site

Wednesday 07.25.18
Posted by Progressive-Street
 

There is no “perfect” focal length for Street Photography

007_by_batsceba-d8cpdjq.jpg

telephoto lenses in street photography

by Batsceba Hardy

Many photographers are not a fan of using telephoto lenses in street photography. Generally they find telephoto lenses too impersonal, without the sense of intimacy that lenses with focal lengths of 28mm-55mm (35mm and 50mm in particular) produce. The believe that these shorter focal lengths force you to get closer to your subject (sharing their human condition and feeling their environment). However, if you analyze the works of Leiter, whose street photography is shot with a relatively long lens you have to change your mind: he compresses his scenes creating a peculiar geometric vision Here's what Leiter responds to Dean Brierly

D.B.: Many of your images have a compressed spatial perspective. Was the telephoto your preferred lens?

Leiter: I liked different lenses for different times. I am fond of the telephoto lens, as I am of the normal 50 mm lens. I had at one point a 150 mm lens and I was very fond it. I liked what it did. I experimented a lot. Sometimes I worked with a lens that I had when I might have preferred another lens. I think Picasso once said that he wanted to use green in a painting but since he didn’t have it he used red. Perfection is not something I admire. [Laughs]. A touch of confusion is a desirable ingredient.

Haircut © Saul Leiter 

Haircut © Saul Leiter


© Saul Leiter

© Saul Leiter

Indeed, the telephoto lens, which compresses the image, has very interesting visual painterly qualities. The distance allows you to relax and compose more freely, without shooting blindly hoping to be lucky.

I will also report this anecdote in defense of a good use of a tele:

Rene Burri:   “In those days Henri Cartier-Bresson limited us to lenses from 35 mm to 90 mm. When I showed him the photos he said, ‘brilliant René!’ I went outside and shouted ‘Hah!’ He heard me and said ‘what was that?’ I said, ‘nothing, never mind’. The lens I used was 180 mm – I never told him! At that point I broke loose from my mentor. I killed my mentor!”

Copyright Rene Burri / Magnum Photos. BRAZIL. Sao Paulo. 1960. 

Copyright Rene Burri / Magnum Photos. BRAZIL. Sao Paulo. 1960.


"People generally think of telephoto lenses as capturing less space than a wide angle lens for a given framing, but this isn’t totally true. If you’re framing your subject similarly, the compositional space you lose on the 2D plane, you can essentially regain on the Z axis. Meaning, since you have to stand further from your subject for equivalent framing, you get more space in between the camera and your subject to work with, space that so often goes unused. Although photography is a 2 dimensional medium (usually), that doesn’t mean the option to express yourself through the third dimension isn’t there. It just takes a little more work." Napier Lopez

The milk carton golfer. 90mm © Napier Lopez 

The milk carton golfer. 90mm © Napier Lopez


Many famous photopraphs used telephoto lens:

“Since the early 1950’ Kertész had been photographing using a telephoto lens. Thus at a distance from his subjects, every day he would photograph passerby’s in Washington Square or people reading on they roof terraces from his apartment”

André Kertész: Paris, Autumn 1963 - p. 7 paragraph 1

Circus, Budapest 1920 © André Kertész 

Circus, Budapest 1920 © André Kertész


  • Shooting candid: with a telephoto lens you can take pictures without getting noticed

  • The artistic element you may add to your pics due to the background flattening effect of telephoto lenses

  • Z-Axis and perspective.

  • You are not losing the intimacy and the human element just by using a telephoto lens

***PRO: framing, details, compressed perspective, you can photograph without being noticed

***CON: shorter focal lengths are more versatile, faster shutter speeds required, you don’t engage with your subject.

Ultimately: there is no “perfect” focal length for Street Photography: the best lens for Street Photography is the lens you have on you. An artwork doesn’t need to be defined by the tools you used to get that result, it should be defined by the end result:

Focal Length 200 mm © Matt Lain

Focal Length 200 mm © Matt Lain

Focal Length 155 mm, Confinement © Jonathan Danker

Focal Length 155 mm, Confinement © Jonathan Danker

I’m a “street photographer” of the distance (105 mm):

Batsceba Hardy

18192472_10212378594878007_161088193551955604_o.jpg 18192436_10212378595998035_5789269766265790098_o.jpg 18156366_10212378587037811_7689577823963165903_o.jpg 18121079_10212378593757979_6149055594488056511_o.jpg 18155809_10212378591277917_5070329837433675957_o.jpg 18076770_10212378597758079_2481241308856560944_o.jpg 18076495_10212378436394045_5854689380004418435_o.jpg

References:

rene-burri-interviews

A Case for Street Photography with A Telephoto Lens

Saul Leiter: The Quiet Iconoclast

in-defense-of-telephoto-lenses-for-street-photography

Sunday 05.20.18
Posted by Progressive-Street
 

Street Photography’s Common Failures

dsc6241_2_by_batsceba-d7ejl5i.png

by Patrick Monnier

Street photography is a tough genre to define. Although there seems to be general consensus that street photography should reveal something about humans in their environment and that it should be captured in a candid way, discussions and arguments abound about whether specific specimens do indeed belong to the genre or instead should be pushed into a different category.

Is this street photography?

Is this street photography?

This nebulous identity makes street photography difficult to critique as there are no sets of characteristics or properties that can be used to evaluate particular images. Instead of listing characteristics I believe are likely to produce a good street photograph, I will instead discuss some the most important factors I believe contribute to a bad street photograph. Most of the time, street photos fail in some classic and consistent ways and I will address these “failures” under three categories: Technical failures, compositional failures, and emotional failures. Technical failures are about mistakes in camera settings, compositional failures are about mistakes with respect to where the camera is placed when pressing the shutter and emotional failures are about the viewer’s emotional response (or lack thereof) to a photograph.

Technical Failures

The first category is about stuff related to how the camera is setup and essentially is about focus and exposure. The good news is that technical failures are relatively easy to fix. The bad news is that avoiding technical failures does not guarantee good street photos…

One of the most common mistakes in street photography is bad focus. For example, if your main character is crossing a street and focus is set on the building behind it then I would call that a missed shot. No matter how good the image would have been with proper focus, no amount of rationalization in my opinion will make that image salvageable. Camera autofocus systems can be tricky to understand and to work with so mastering your camera’s auto-focus is essential. One of my first cameras when I got into street photography was the Fuji X100. It’s an amazing little camera but its autofocus was often too slow for street photography so I preset my focus (a concept called zone focusing). Regardless of how you decide to set your focus, make sure that it is set where you want it to be. Start reading your camera manual, go on YouTube, and practice. A good way to practice your autofocus skills for street photography is actually with sports photography as there are many analogues between the two genres.

Blur: Although blue can add to the composition by, for example, isolating a subject, in this case, blur makes the image unuasble.

Blur: Although blue can add to the composition by, for example, isolating a subject, in this case, blur makes the image unuasble.

Exposure is a fair bit more complicated than focus and basically refers to the proper light exposure on your sensor or film at the time of the image capture. As you know, exposure is determined by three camera settings: Sensitivity, aperture, and shutter speed. While it is possible to let the camera’s algorithms do most of the guessing when it comes to proper exposure, I invariably find that I can attain a more pleasing and satisfying exposure when I set al three parameters manually. Setting your camera in manual mode can be daunting at first but rewarding at the end and here again, practice is the way to go.

Before talking about the camera’s exposure settings, let me briefly explain the concept of under- and over-exposure. The best analogy I can think of is with a paper towel used to wipe a wet surface. If the paper towel is allowed to contact the wet surface for too long, the paper towel absorbs too much water, it saturates and when lifted from the surface, it breaks. This is the equivalent of over-exposing your film or sensor. Too much water (light) has accumulated on the paper towel (film or sensor of the camera) and the paper towel (film or sensor) is saturated. Over-exposed images are overly white and detail is lost in the highlights. People often talk about blown highlights in photography, which describe this exact situation when portions of the sensor or film have been exposed with light beyond the ability of the sensor to respond. The opposite situation is when the paper towel is not allowed to contact the water for long enough and hence little water is absorbed from the surface. This is the equivalent of not enough light hitting the sensor resulting in an under-exposed image. Under-exposed images are overly dark and loss of detail is again an issue but this time in the shadows. Proper exposure is when the paper towel is allowed to collect just the right amount of water so that the table can be cleaned without the paper towel breaking down. A properly exposed photograph has shadows and highlights in balance, with fine details visible in both highlights and shadows.

For this image, I carefully set my aperture and shutter speed in order to over-expose the woman and darken the surroundings. The extreme high contrast results in a dramatic image.

For this image, I carefully set my aperture and shutter speed in order to over-expose the woman and darken the surroundings. The extreme high contrast results in a dramatic image.

As a quick guide for getting you going on street photography in manual mode and hopefully attaining proper exposure, I suggest your start with setting sensitivity or ISO. Setting sensitivity should take your camera to its optimal dynamic range for a particular lighting situation. If you are shooting in the sun, I recommend starting off with the lowest sensitivity setting on your camera (ISO 100 or 200). If in the shade or during a cloudy day, try a sensitivity setting a bit higher like ISO 400-800. Nighttime street photography can require much higher sensitivity settings up to maybe ISO 4,000-8,000.

Once sensitivity is set, based on the particular situation, you need to decide what is more important in the images you are trying to capture. If temporal aspects of the scene are what you want to control (e.g.; freezing the movement of fast moving subjects or create some motion blur), set shutter speed accordingly (fast to freeze motion and slow to create motion blur). Again, as a rough guide, I suggest a shutter speed of 1/250 or higher to freeze humans walking and yet higher if your subjects are moving faster. If depth of field is what you are after (for example, if you’d like to isolate your subject by blurring the background, set your aperture to as wide as your lens will allow (e.g.; f1.8). The last adjustment is for the setting you care the least about. If you set your shutter speed at a relatively high 1/1,000 sec to freeze bicycles going by, then final proper exposure is set with aperture. If, on the other hand, you have set aperture to f1.8 to isolate your subject (shallow depth of field), you might have to set shutter speed relatively high to achieve final proper exposure.

A shallow depth of field here helps define the man’s face as the subject.

A shallow depth of field here helps define the man’s face as the subject.

If you find that you cannot achieve the desired outcome by setting your shutter speed and aperture, then you might have to go back to adjusting sensitivity. For example, if your shutter speed is set at 1/500 and you must set your aperture at f1.8, which results in an awkwardly and unpleasing shallow depth of field, increase your sensitivity by several stops. This will allow you to keep your relatively fast shutter speed and will allow you to close down your aperture to increase depth of field.

One last pointer I would like to share. I find that with today’s modern cameras, shadows can be recovered in ways that were simply impossible just a few years ago (this is especially true if you shoot RAW). I therefore tend to UNDER-expose all my images. Not only do I personally prefer strong shadows and bold contrast but I also know I can recover an impressive amount of information in post-processing from shadows, if need be. The same cannot be said of over-exposed portions of an image. A blown highlight, in my experience, is much harder to recover.

To conclude, focus and exposure are technical aspects of street photography that are clearly very important but problems related to these are relatively easy to rectify. The next two types of failures are much more difficult to define, explain and naturally are also harder to address as a photographer.

Compositional failures

Composition is as old as photography. Actually, it’s much older than photography and a tremendous amount can be learned about composition by exploring classical impressionist painters. Composition, simply put, refers to the geometry of the rendering of a two-dimensional image. Vision in humans and animals starts with retinal images that are two-dimensional. Subsequently and almost magically, the brain extracts the third-dimension from these impoverished two-dimensional images. One of the keys to good photographic composition is to create two-dimensional images that are suggestive and lend themselves well to the extraction of the third-dimension by the brain. For example, if an image is flat in that it does not contain many cues to depth the human brain will find that image uninteresting.

Composition is a complex topic and I encourage the interested reader to seek additional resources. Here, I will only focus on two aspects of composition that I think are most critical for street photography. One mistake I often see in street photography is that the photographer is simply too far away form his/her subjects. An interesting character that is shot from far away leads to viewer frustration. The viewer wants to be taken right near the interesting subject. As a photographer, it can be intimidating, awkward or even dangerous to get close but as a viewer, it is essential to be taken right there, near the interesting subject. By the way, using a photo lens might seem like an ideal solution to “getting close” but it is not because optically, a telephoto offers optical distortions that result in an image that looks unnatural for street. Such distortions are not present with a wide angle lens (e.g.; 24-50mm). This issue is actually relatively easy to address as well: Get closer.

Although not a great image, getting close often can result in dramatic results.

Although not a great image, getting close often can result in dramatic results.

The second compositional failure results from a lack of informational detail in depth in the image. This aspect of composition is sometimes referred to as layering and essentially refers to capturing multiple aspects or stories of a scene in depth. For example, a nicely layered street photo might have closest to the lens a hand spinning a ball, a bit further might be a group of children playing marbles, yet further away a group of adults engaged in a lively conversation while furthest back a classic car rolling down the street. Such layered images are a delight to view because it is easy and fun to get lost in the multiple stories and it is possible to go back and forth between the stories. I personally find this aspect of composition to be most difficult to achieve well in a candid scene (candid, as you recall, is one of the pre-requisites for street photography). In addition to exploring the classic masters of street photography and look for that particular aspect of composition (layering), I again suggest consulting classic works by impressionist painters, some of whom mastered such compositional concept.

Emotional Failures

Unfortunately, it is possible and in fact quite common to have street photographs be technically good, follow basic rules of composition but to still fail. How can that be? A street photo can be technically sound, adhere do basic rules of composition but fail to elicit an emotional response. An image that does not elicit an emotion in the viewer is a failed image. I don’t believe it matters what emotion is ultimately felt by a viewer and can be a positive or negative. It can be joy, happiness, outrage, anger, surprise, amusement, curiosity, etc., but an emotion must be triggered by an image; viewers must feel something when looking at your photo. In fact, I would argue that the stronger the viewer’s emotion the more memorable and hence successful the image. The emotional response to an image is the most important component of a successful (street) photo and indeed can make up for other shortcomings such as technical or compositional issues.

This image is very emotional for me and after taking it, I decided against publishing it for several week in order to be more objective in assessing the image’s emotional impact. Fortunately, my opinion did not change....

This image is very emotional for me and after taking it, I decided against publishing it for several week in order to be more objective in assessing the image’s emotional impact. Fortunately, my opinion did not change....

For the photographer, emotional failures are hard to recognize. The reason is because the photographer’s own emotional response attached to an image is projected onto the viewer. There is always a story about how a particular photograph is obtained and the photographer has his/her own emotions attached to a particular photograph. Unfortunately, it is often the case that the photographer’s emotions differ from the viewer’s emotional response (or lack thereof). As a result, it is often very hard to objectively curate ones’ own images because it is difficult to leave the photographer’s emotion in check. Some suggest (and I tend to agree but it’s not entirely practical) that a photographer should not look at his/her images for a long time, maybe 6 months to a year, after initially taking them in order to reduce or eliminate that photographer’s emotional attachment. The good news is that it is relatively easy to get feedback on various specialized forums. Regarding soliciting feedback, remember that opinions and quality of feedback varies widely. If you feel a particular critique is unjust or misses the point, be gracious, appreciate the person’s time, be thankful, and above all, do not get defensive. Maybe your critique really did not get your image, or on the other hand maybe he/she really did…

Sunday 04.08.18
Posted by Progressive-Street
 

Smartphone tricks and tips

18.png

Smartphone tricks and tips

Smartphones. How to reach fine quality photographs in few steps.

“The best camera is the one you have with you” standard quote of Chase Jarvis (Pulitzer Winner)

“The best camera is the one you have in the pocket” my quote… but how perform good quality PHOTOGRAPHS with a mobile phone? So here, I’m giving enough knowledge, tips and examples-on-field to promote shooting with mobile phones, according my experience of about 5 years shooting with mobile phones.

VERY IMPORTANT NOTE: BEAR IN MIND THAT MOBILE PHONE PHOTOS WILL NEVER OVERLAP THE QUALITY OF YOUR CAMERA, DUE TO MANY TECHNICAL REASONS. (SENSORS, LENSES AND SO ON)

I will talk about PROFESSIONAL photos and not SNAP so all the software that I’m talking about is PRO-APP.

Proceeding by steps:

1 - KNOW YOUR CAMERA AND SETTINGS ( AT HOME PREPARATION )

Like a normal camera we have to clearly understand what we have in our pocket and how we can improve our photographs with quick settings in the menu.

I actually use a SAMSUNG S7EDGE so far my tips basing on ANDROID system but I think that also I-phone users could take some inspirational ideas.

a. RAW/JPG – modern mobile phones can shoot even in Raw so set your camera at max quality possible and chance to shoot both raw and jpg. (photo n.1) .

b. PRO MODE – it works like a low-cost compact cameras as you can manage ISO, WB, SHUTTER SPEED, and most important MANUAL FOCUS ( photo n.2 and n.3). I don’t waste time to set automatic focus or zone one even if is quick as a speed of light.

c. HYPER FOCAL COMPUTES AND FOCUS ARRANGEMENTS – I’m using the free-app “PHOTOGRAPHER COMPANION’S” whenever I’ve got doubts about focusing (photo n.4). I set my sensor details and save my lens preset (photo n.5)

d. BATTERY AND SD CARDS – one of the problem of the modern smartphone ins the battery life and the storage. When I’m supposing to shoot with mobile I have with me always a flat shaped power-bank. High-speed sd card are of course the winner in that case, and up to my experience a 32 GB one is more than enough also to store for a while the photos once processed and to manage the APP installed in the phone. Before starting order to spare battery I cutting off wi-fi or BT connections, GPS and sometimes I’m able also to lower the brightness of the screen, but only when I’m pretty sure about my actual light exposition. My habit is to listen music during my shot and I found out a good reader named “Jet Audio” that owns a good quality and does not drink your battery as a Ferrari.

2 -  TO USE( AT HOME PREPARATION)

There’s so many APP in the Play Store about photography … but those are the best solution to pushing your photos to the limit. Nothing is free about professional photography, so it is a waste of time to try to find out the cheaper or the free app around the store. This is my bag:

a. BUILT-IN-CAMERA of the mobile phone is the best one. You can easily update and never crash, and who knows the potentials of your cam better than the producers do? Only you isn’t?

b. Already talk about “PHOTOGRAPHER’S COMPANION’S” mentioned in the 1.c of this article.

c. LIGHTROOM FOR MOBILE – It costs 5 coffees per month but it worthy for many reasons. First at all is the editing quality of your photographs, it works directly on RAW as CAMERA RAW in Photoshop. It owns same options basically. So don’t waste time to find-out other (free) app that converts your photos in tiff or png or in other formats. Those kind of APP do not take in consideration lens aberrations, colours or exposure mode of you mobile phone camera and you have to kill yourself order to understand how to manage lately that issue. Forget Snapseed if you want to let your photo being destroyed. It is a good (free) APP for play, not of course a professional one. LR also save the photo in a cool HiRES quality readable for all APP and is able to manage your projects in a proper way with a nice system of folders. You can save photos also in ADOBE CLOUD spearing some space in the SD card. Sad to say that there is no chance to load your presets but you can make new one, save the contents, copy and paste your creation in the next photograph.

d. VSCO-X is of course the best app order to create and simulate Classic Films and the editing tools is very powerful. In the last update there’s also the chance to manage HLS colours but you have always be careful to don’t exaggerate order not to destroy your previous work in LR session. Bad things that is not free so the film pre-sets have a cost and at the moment there’s no chance for the Android Users to work directly with the RAW, but it seems (talking to developers in California) that soon that issue will be solved. As “X” member of VSCO you can access in several services, new film filters and a web platform of sharing photos together with other world-wide users therefore, it is a cool APP to enchant your photographs make friends and get inspired!

e. PHOTOSHOP EXPRESS – This is an amazing free app from Adobe where you can make the final adjustments in your photo edit. Correction of light and colour noise, fog, exposition and contrasts, light, shadowing, black\white , saturation and so on with some pre-set free to use. One of the best thing is that you can save photo at the resolution you wish (photo n.6)

3 - BEHAVIOUR ( ON FIELD )

In my experience, shooting with mobile phone is quite different despite with a camera. Sometimes I feel like have a RICOH GR 2 in my hands. I feel more focused in details, and comfortable as I look around and I see that all guys and girls, young and old people, tourists and locals shooting with a mobile phone without shy and actually I don’t care if I am in an empty square or inside a crowded subway. Smiling and shooting, sometimes I follow also tourist groups to feel free to shoot if I want perform portraits or close-up. Less you appear as a photographer, more you can feel free to take photos even at 20 cm from your subject!

4 - LET’S SHOOTING! ( ON FIELD )

Good camera helps photographer to perform good photo, but everyone knows that it is 50/50 true (or wrong). Without a proper eyes training, we will never able to perform interesting and story-telling or street photos in that case. I assume that the term “composition” is well known from whom is reading my article.

Therefore, I take that shot yesterday inside Metro at Rome, so artificial lights with my mobile phone this is a screen shot from the RAW ( photo n.7 ). Exif are: F1,7 ISO200 SS1/180 – the shot is perfectly focused, but maybe a little underexposed, but I decided anyhow to work the file as I love that shot.

5 - POST EDITING ( ON FIELD \ AT HOME )

a. So I first open my raw in the LIGHTROOM APP and start my processing to light a little more the scene, adjusting some shadows and let the photo less green due to the White Balance that sometimes is not “perfect” ( photos n. 8,9,10). That kind of processing last 5 minutes max and finally I save my work (photo n. 11 ).

b. Therefore it is time to use VSCO-X ( photo n. 12, 13 ) so I decide to simulate a KODAK GOLD 200 FILM (photo n.14) , and adjust a little some tones in that preset order give character to my photo. It takes roughly 2 minutes to adjust. And save photo for the next step.

c. I open the photo with the ADOBE PHOTOSHOP EXPRESS order to make the final adjustments of noise reductions, lights and shadows contrasts, at the end to “clean” my photo in case of noise, as total 5 minutes of processing (photo n.16, 17)

NOTE: before to start this last process check in the settings the format desired for save the photo (photo n.6) as later on you cannot do that!

Of course the step b. and c. could be bypassed if you think that LR process is enough !

So in 15 minutes or less the results is quite good from my point of view. You have a photo share-ready in social networks or in a better case for you, for the editor of a newspaper waiting for the shoot (photo n.18 - screenshot).

I hope you enjoyed my tips and get ready for next Topics!

Davide Dalla Giustina for Progressive-Street community

1.png
2.png
3.png
4.png
5.png
6.png
7.png
8.png
9.png
10.png
11.png
12.png
13.png
14.png
15.png
16.png
17.png
18.png
Thursday 04.05.18
Posted by Progressive-Street
 
Newer / Older
Subscribe to newsletter